

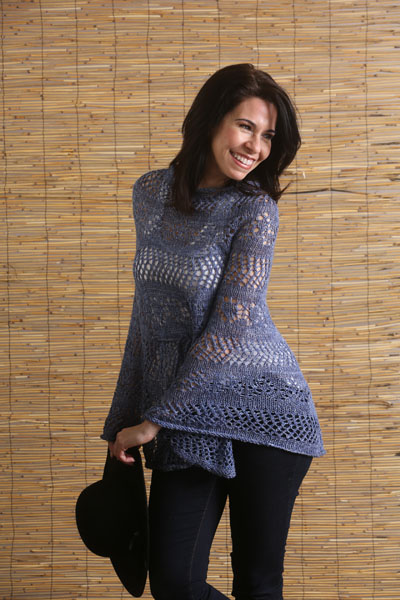
Embrace the relaxed vibes of summer with the Coastal Cover Up, a beautiful lace poncho that’s the perfect alternative to a cardigan. This easy-to-knit design features a combination of delicate lace patterns, separated by smooth stockinette stitch rows, creating a lightweight and airy piece. Whether you’re heading to the beach as a chic cover-up or running errands in style, this versatile poncho will keep you comfortable and fashionable all summer long. Ideal for knitters looking for a simple yet elegant project to showcase their lace skills.
Skill Level: Intermediate
Size: Small (Medium, Large) to fit bust 32 (44, 56)”
Shown in size Medium (50” around arms at bust, including recommended positive ease.)
Gauge: 14 sts and 22 rows = 4” [10 cm] in St st, after steam blocking
Materials
 Yarn: Handmaiden Fine Yarns Lino (65% silk, 35% linen; 874 yards [800 meters]/100 grams): Polar Sea, 2 (2, 3) skeins, held double throughout.
Needles: US size 6 (4.0 mm): 20” and 32” circular, two US size 6 (4.0 mm) DPNs.
Notions: 4 stitch markers (one must be unique to denote start of round).
Abbreviations
DPNs: double pointed needles
inc: increase
k2tog: knit next two stitches together (decreases by one st)
k3tog: knit next three stitches together (decreases by two sts)
PM: place marker
SM: slip marker
ssk: slip two stitches knitwise onto right needle, slip both back onto left needle, knit these two stitches together (decreases by one st)
St st: stockinette stitch (in the round, knit all sts)
sts: stitches
yo: yarn over
Pattern Notes
This pattern is worked in the round from the top down.
This poncho features a stockinette stitch rolled edge at the collar and hem.
In the lace sections, slip the markers when you come to them, but do not remove them unless stated otherwise.
Switch to the 32” long circular needless when you get uncomfortable on the 20”.
Pattern
CO 80 (84, 132) sts, being careful not to twist the sts, join to knit in the round.
Rnd 1: Place the unique marker for start of round, knit all sts.
Rnds 2-18: Knit.
Shoulder Shaping
Small only
Rnd 19 (Rnd 1 of Chart A): *Ssk, yo; rep from * to end of rnd.
Rnd 20 and all even rows in chart: Knit.
Rnds 21 and 23: Same as Rnd 19.
Rnds 25, 27, 29 and 31: *Yo, k2tog; rep from * to end of rnd – 80 sts.
Rnds 32-40: Knit.
Medium and Large only
Rnd 19 (Rnd 1 of Chart A): (Ssk, yo) 10 (16) times, pm, (k1, yo) twice, (ssk, yo) 20 (32) times, (k1, yo) twice, pm, (ssk, yo) 10 (16) times – 88 (136) sts.
Rnd 20 and all even chart rnds: Knit
Rnd 21: Work (ssk, yo) to marker, sm, (k1, yo) twice, work (ssk, yo) to 2 sts before next marker, (k1, yo) twice, sm, work (ssk, yo) to end of rnd – 92 (140) sts.
Rnd 23: Repeat Rnd 21 – 96 (144) sts.
Rnd 25: *Yo, k2tog; rep from * to marker, sm, (k1, yo) twice, *yo, k2tog; rep from * to 2 sts before next marker, (k1, yo) twice, sm, *yo, k2tog; rep from * to end of rnd – 100 (148) sts.
Rnd 27: Repeat Rnd 25 – 104 (152) sts.
Rnd 29: Repeat Rnd 25 – 108 (156) sts.
Rnd 31: Repeat Rnd 25 – 112 (160) sts.
Rnds 32-40: Knit all rnds, removing all markers except start of rnd marker.
Body Shaping
All Sizes
Section 1 – Arrow Lace
Rnd 1: *K3, yo, k3, k2tog; rep from * to end of rnd.
Rnd 2 and all even rows: Knit.
Rnd 3: *K2, yo, k3tog, yo, k3; rep from * to end of rnd.
Rnd 5: *K1, yo, k2tog, k1, ssk, yo, k2; rep from * to end of rnd.
Rnd 7: *Yo, k2tog, k3, ssk, yo, k1; rep from * to end of rnd.
Rnd 9: Same as Rnd 3.
Rnd 11: Same as Rnd 5.
Rnd 13: Same as Rnd 7.
Rnd 14: Knit.
Section 2 – Stockinette with increases and setting up markers
Rnd 1 (Inc Rnd): Remove marker for start of round, k4 (12, 20) sts, replace marker for start of round (this is the new start of round), yo, k1, yo, k30 (30, 38), yo, k1, yo, pm, k8 (24, 40), pm, yo, k1, yo, k30 (30, 38), yo, k1, yo, pm, k8 (24, 40) – 88 (120, 168) sts.
Rnd 2 and all even rows: Knit
Rnd 3: SM, yo, k1, yo, knit to one st before next marker, yo, k1, yo, sm, k to next marker, sm, yo, k1, yo, knit to 1 st before next marker, yo, k1, yo, sm, k to next marker – 96 (128, 176) sts.
Rnd 5: Same as Rnd 3 – 104 (136, 184) sts.
Rnd 7: Same as Rnd 3 – 112 (144, 192) sts.
Rnd 8: Knit.
Section 3 – Mesh Lace
Rnd 1: *Ssk, yo; rep from * to end of rnd.
Rnd 2 and all even rows: Knit.
Rnds 3 and 5: Same as Rnd 1.
Rnd 7: *Yo, k2tog; rep from * to end of rnd.
Rnds 9, 11, and 13: Same as Rnd 7.
Rnd 14: Knit.
Section 4 – Stockinette with increases
Rnd 1 (Inc Rnd): SM, yo, k1, yo, knit to 1 st before next marker, yo, k1, yo, sm, k to next marker, sm, yo, k1, yo, knit to 1 st before next marker, yo, k1, yo, sm, k to next marker – 120 (152, 200) sts.
Rnd 2 and all even rows: Knit.
Rnds 3, 5, and 7: Same as Rnd 1 – 144 (176, 224) sts.
Rnd 8: Knit.
Section 5 – Circle Lace
Rnd 1: *K5, yo, k3tog, yo; rep from * to end of rnd.
Rnd 2 and all even rows: Knit.
Rnd 3: *k1, yo, k3tog, yo, k4; rep from * to end of rnd.
Rnds 5 and 7: *Ssk, yo, k1, yo, k2tog, k3; rep from * to end of rnd.
Rnd 9: *Yo, k3, yo, ssk, k, k2tog; rep from * to end of rnd.
Note: On the rnd, the stitch marker is being moved over one stitch. At the end of the rnd, work the last k2tog with the yo at the beginning of the round.
Rnd 11: Same as Rnd 1.
Rnd 12: Knit.
Section 6 – Stockinette with increases
Repeat Section 4 – 176 (208, 256) sts.
Section 7 – Mesh Lace
Repeat Section 3.
Section 8 – Stockinette with increases
Repeat Section 4 – 208 (240, 288) sts.
Section 9 – Arrow Lace
Repeat Section 1.
Section 10 – Stockinette with increases
Repeat Section 4 – 240 (272, 320) sts.
Section 11 – Mesh Lace
Repeat Section 3.
Hem
Knit 12 rnds.
Bind off loosely.
I-Cord Belt
CO 4 sts onto a DPN.
Rnd 1: With second DPN, k all sts, slide the opposite end of the needle.
Rnd 2: Without turning, k all sts, slide to the opposite end of the needle.
Repeat Rnd 2 until cord measures 45 (60, 75)” long.
Finishing
Weave in all ends. Steam block.
The i-cord will be your belt. Pull the i-cord through the lace holes at the back and the front of Section 6. When wearing the poncho, tie the belt to keep the poncho in place.
Looks like the magazine left some additional information out, besides the chart, …
What is the recommended ease?
What is the circumference of the small at the bust?
Is says the medium is 50″, but no information is given for the other sizes or what the recommended ease is.
Hi Jenny!
Here is the chart pattern: https://www.ilikeknitting.com/wp-content/uploads/Love-Lace-Summer-Cover-up_CHART.pdf
I’ve reached out to the designer for advice and she or I will reply as soon as possible. Thanks! – Nicola, Editor
Would have loved to download pdf file of pattern?
What is the cast on for medium 80 for small and 84 for medium seems like a typo maybe
Hi Nancy, I’m Sabrina, the designer.
It does indeed look like a typo, but those numbers are correct. The reason for this is that to get an adult’s head through the opening, the cast on needs to be at least 80 sts, and rate of increase for a small vs. medium is different. Trust the instructions and you will be fine. 🙂
I will give it a try. I will let you know how it is when I am done. Nice pattern and I need a light weight poncho to wear during Summer
The pattern repeatedly refers to a “chart” but there is none with the pattern nor any link that I can discover – Please advise
Hi Roselle,
I’m Sabrina, the designer. There was a chart published with the original release of the pattern, but it looks like “I Like Knitting” decided not to release it here. Sorry about that! Maybe try contacting the “I Like Knitting” staff through their contact us e-mail.
Gorgeous. What a challenge.