

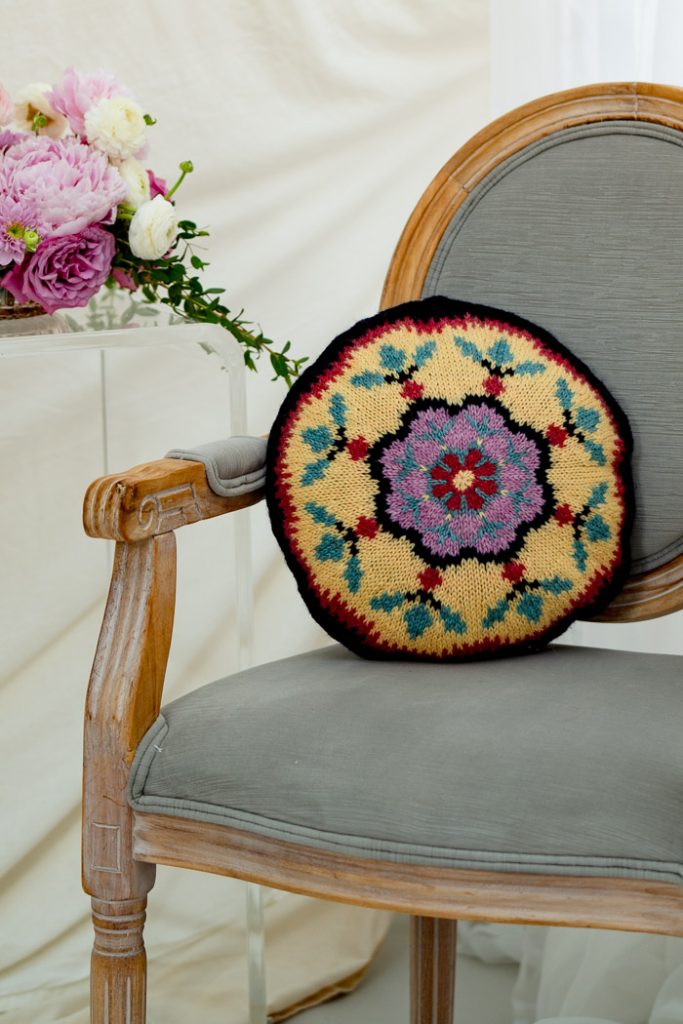
This pillow design takes inspiration from the medallion at the center of a traditional rug. The front is crafted in the round using a disappearing loop cast on and features increasing rounds of stranded knitting. The first seven repeats of the pattern are identical, while the eighth and final repeat includes slight modifications to camouflage the round jog, starting with an additional stitch added in Round 7. The back comprises two overlapping semicircles, worked from garter tabs and secured with buttons. Upon completion, the front and back are placed together and finished with an I-cord 3-needle bind-off, resulting in a beautifully cohesive and elegant pillow.
Time: 1-2 Week Project
Skill Level: Intermediate
Size: 14” diameter round
Gauge: 22 sts and 26 rnds = 4″ [10 cm] in St st after wet blocking
 Yarn: Knit Picks Wool of the Andes Worsted (100% wool; 110 yd [100 m] / 1.75 oz [50 g]): 28282 Peacoat (MC), 2 skeins; 25975 Creme Brulee (CC1), 1 skein; 29845 Rose (CC2), 1 skein; 25647 Fjord Heather (CC3), 1 skein; 25644 Pink Posy Heather (CC4), 1 skein.
Needles: US size 8 (5 mm): circulars (cir) or double-pointed (dpn) for working small circumference in the round. US size 7 (4.5 mm): circulars (cir) or double-pointed (dpn) for working small circumference in the round. Extra circulars, same diameter or smaller, to hold front and backs while working 3-needle I-cord bind-off. Adjust needle size if necessary to obtain the correct gauge.
Notions: marker, tapestry needle, eight 5/8-inch buttons.
Special Stitches:
LLI [Left Lifted Increase]: With left needle lift the stitch below the stitch just worked, and knit it. 1 stitch increased.
Pf&kb [Purl into front of stitch]: then knit into back of same stitch. 1 st inc.
RLI [Right Lifted Increase]: With right needle lift the stitch below the next stitch, and knit it. 1 stitch increased.
Disappearing Loop Cast-on: The disappearing loop cast-on goes by many names and involves casting on a few stitches into a loop. This method may be used interchangeably with other methods for casting on a few stitches at the center, including Emily Ocker’s Cast-On. Starting with a 12” tail, form a loop with the tail to the left and the working yarn crossing over and to the right. Insert LH needle into loop. Make sure the loop “stitch” is not too tight, so you can work 8 stitches into it. The loop will be tightened later. While the loop “stitch” needs to be a little loose, the stitches you cast on should be relatively tight. Maintaining your hold on the tail, and working into the loop “stitch”, (k1, p1) 4 times, creating 8 stitches. If your tail is hard to pull, don’t worry, it should loosen up in the first round.
To begin your first round, slide the stitches to the other end of your needle. If using dpns, work 2 stitches onto each of four dpns. If using magic loop, work four stitches, and then pull RH needle through four stitches just worked so they are in middle of cable; work remaining four stitches. If using two circulars, work first four stitches with second needle, and final four stitches with original needle. Mark beginning of round.
Garter Tab Cast-on: My method of working a Garter Tab Cast-on is a bit different than most, and doesn’t involve picking up stitches. Slipped stitches make the outside edge of the garter border smooth. If using a more traditional Garter Tab Cast-on, it needs to be 4 stitches x 5 rows (2 garter bumps, and then 2 stitches picked up, for a total of 10 stitches). Using Judy’s Magic Cast-on (free instructions from Knitty Spring 2006, https://knitty.com/ISSUEspring06/FEATmagiccaston.html), cast-on 4 sts onto each needle. 8 sts. For garter stitch, we want to see the purl bumps on what is normally the WS. Taking care to keep the working yarn and yarn tail secure and keeping all stitches where they have been cast on, rotate needles from pointing at the left wall forward to pointing at you, and keep rotating until the they are pointed at the right wall with purl bumps showing. The top needle is still on top. With both needles pointing right, pull yarn tail to left and keep it trapped with working yarn. Carefully pull bottom needle through 4 bottom stitches until bottom stitches are in center of cable. To help keep the RS and WS straight; note that the yarn tail is at the outside edge of your shawl.
Row 1 (RS): Sl1p wyif, k3; turn.
Row 2 (WS): Pf&kb, k3; turn. 5 sts on needle, 4 on cable.
Row 3: Sl1p wyif, k3; turn. (1 st remains unworked)
Row 4: Pf&kb, k3; turn. 6 sts on needle, 4 on cable.
Pull right needle through stitches just worked, sliding them onto cable with provisional stitches. 10 sts. Slide stitches back onto needle.
Row 5: Knit.
I-cord 3-needle bind-off:
After casting on 3 stitches, with wrong sides facing:
- Slide 3 I-cord sts onto back LH needle.
- Using 3rd needle: K2, Sl1kwise from I-cord, Sl1kwise from Front, p1 from Back, pass slipped sts over.
Repeat steps 1 and 2 until desired number of sts are bound off.
Note that Front and Backs may be on smaller needles for bind-off; Needle used to knit I-cord sts must be size used to work front and backs,
PATTERN
Front:
With CC1 and larger needles, use disappearing loop method to CO 8 sts.
Round 1: Distributing stitches as specified above, with CC1, K8; place marker.
Work Rounds 2-38 from chart or written instructions, working Standard Repeat 7 times and Final Repeat once.Front is complete.
Lower Back:
Using smaller needle, work 4 st x 4 row Garter Tab from instructions above or desired method. (10 sts)
Row 1 and all odd (WS) Rows: Sl1p wyif, k3, p to last 4 sts, k4.
Row 2 (RS): Sl1p wyif, k3, (k1, LLI) 2 times, k4; turn. (12 sts)
Row 4: Sl1p wyif, k3, (k1, LLI) 4 times, k4. (16 sts)
Row 6: Sl1p wyif, k3, (k1, LLI) 8 times, k4. (24 sts)
Row 8: Sl1p wyif, k3, (k1, LLI, k1) 8 times, k4. (32 sts)
Row 10: Sl1p wyif, k3, (k3, LLI, k3) 4 times, k4. (36 sts)
Row 12: Sl1p wyif, k3, (k5, RLI, k2) 4 times, k4. (40 sts)
Row 14: Sl1p wyif, k3, (k1, LLI, k8) 4 times, k4. (48 sts)
Row 16: Sl1p wyif, k3, (k2, LLI, k6, RLI, k2) 4 times, k4. (52 sts)
Row 18: Sl1p wyif, k3, (k5, LLI, k6) 4 times, k4. (56 sts)
Row 20: Sl1p wyif, k3, (k11, RLI, k1) 4 times, k4. (60 sts)
Row 22: Sl1p wyif, k3, (k3, LLI, k10) 4 times, k4. (64 sts)
Row 24: Sl1p wyif, k3, (k7, RLI, k7) 4 times, k4. (68 sts)
Row 26: Sl1p wyif, k3, (k3, LLI, k12) 4 times, k4. (72 sts)
Row 28: Sl1p wyif, k3, (k13, RLI, k3) 4 times, k4. (76 sts)
Row 30: Sl1p wyif, k3, (k5, LLI, k7, RLI, k5) 4 times, k4. (88 sts)
Row 32: Sl1p wyif, k3, (k9, LLI, k10) 4 times, k4. (92 sts)
Row 34: Sl1p wyif, k3, (k15, RLI, k5) 4 times, k4. (96 sts)
Row 36: Sl1p wyif, k3, (k6, LLI, k15) 4 times, k4. (100 sts)
Row 38: Sl1p wyif, k3, (k11, RLI, k11) 4 times, k4. (104 sts)
Row 40: Sl1p wyif, k3, (k7, LLI, k14) 4 times, k4. (108 sts)
Row 42: Sl1p wyif, k3, (k15, RLI, k7) 4 times, k4. (112 sts)
Row 44: Sl1p wyif, k3, (k4, LLI, k115, RLI, k4) 4 times, k4. (120 sts)
Upper Back:
Work as Lower Back except Rows 4, 16, 28 and 40, where buttonholes are added.
Row 4: Sl1p wyif, k1, SSK, yo, (k1, LLI) 4 times, yo, k2tog, k2. (16 sts)
Row 16: Sl1p wyif, k1, SSK, yo, (k2, LLI, k6, RLI, k2) 4 times, yo, k2tog, k2. (52 sts)
Row 28: Sl1p wyif, k1, SSK, yo, (k13, RLI, k3) 4 times, yo, k2tog, k2. (76 sts)
Row 40: Sl1p wyif, k1, SSK, yo, (k7, LLI, k14) 4 times, yo, k2tog, k2. (108 sts)
FINISHING
Wet block Front and Backs before joining.
I-Cord and Bind-off:
Slip 52 sts of Lower Back from one needle to the other to begin bind-off in the middle, at the bottom.
Using backward loop cast-on, CO 3 sts onto left needle of Front; this is the bottom of the pillow. Place Front and Lower Back with wrong sides facing and middle bottom aligned. Using larger needle, join 44 sts from each with I-cord 3-needle bind-off, 8 sts of Lower Back remain unjoined at working edge.
Place Front and Upper Back with wrong sides facing and middle top aligned. 8 sts Upper Back at each end overlap on top of 8 sts Lower Back at each end. Next 8 rounds of I-Cord will join 4 sts as follows: K2, Sl1kwise from I-cord, Sl1kwise from Front, p2tog (1 st each from Upper Back and Lower Back), pass slipped sts over.
Join 92 sts from Front and Upper Back with I-cord 3-needle bind-off, 8 sts of Upper Back remain unjoined.
Join next 8 rounds of I-Cord with 4 sts as above.
Join rem 44 sts from Front and Lower Back with I-cord 3-needle bind-off.
Bind off 3 I-cord sts. Sew I-cord cast-on to I-cord bind-off to complete border.
Sew buttons to Lower Back. Weave in all ends.
where can I get written instructions for the fancy floral medallion pillow?
Hi Karen, at this time the pattern is only worked from the chart. – Nicola, Editor