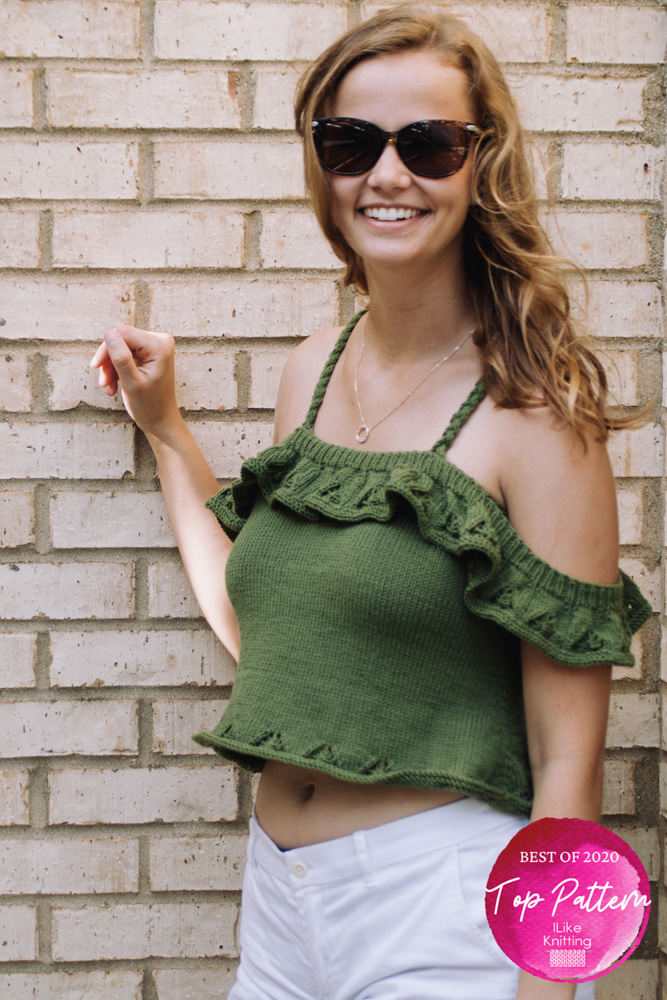
Get ready for summer with this cute summer top! With a hem composed of palm frond style motifs, you’ll be all aflutter and ready to hit the beach! A detailed sewing and fitting guide is included so you can make sure the straps are exactly how long and where you need them.
Skill Level: Intermediate
Size: XS (S, M, L, XL, 2XL, 3XL, 4XL, 5XL) to fit bust size 31 (33, 35.5, 28.5, 40, 42, 45, 50.5, 56.5)”.
Shown in size S
Gauge: 21 sts and 30 rows = 4” [10 cm] in St st after wet blocking
Materials
 Yarn: Cascade Yarns Anchor Bay (50% Cotton, 50% Superwash Merino Wool; 262 yards [240 meters]/100 grams): 26 Olive (MC 3 (4, 4, 5, 5, 6, 6, 7, 7) balls),
Needles: US size 10 (6.0 mm) 24” straight and circular
Notions: Markers, small stitch holders, safety pins, tapestry needle,
Pattern Notes
Everyone’s braids are a bit different, (like gauge in knitting), so instead of exact measurements for the i-cord in the straps, the instructions have you work i-cord that is going to be longer than you need, then there are fitting instructions on how to shorten it and sew them on so your top sits on your body where you want it to!
Special Stitches
Long Loops: You’ll be pulling loops of yarn through each of the six yarn overs in the stitches underneath where you are and leaving the loops on the needle for the next round.
To begin, place left needle through the right-most yarn over from front to back, wrap the yarn around the needle to form a loop and pull the loop through to the front of the work. Place the yarn on right needle. Rep with each of the other five yarn overs, moving from right to left. Be sure to keep the loops nice and loose.
If you find this difficult, it is also possible to pull the yarn through the yarn overs with a crochet hook.
Pattern
Ruffle
Note: If you’re trying to figure out how much yarn you’ll need for the long tail cast on, wrap your yarn around your over-arm (going around your arms and chest at bust level) 4 times, you’ll definitely have enough with a bit left over you can trim off).
Using the long tail method (or another cast on with good stretch) and smaller needles, CO 222 (234, 246, 264, 276, 294, 324, 360, 396) sts. Join in rnd, making sure not to twist sts.
Using Ruffle Chart, or written instructions below, make ruffle.
Rnds 1-8: *K1, p1; rep from * to end of rnd.
Switch to larger needles.
Rnd 9: *M1r, k5, m1l, p1; rep from * to end of rnd. (296 (312, 328, 352, 368, 392, 432, 480, 528) sts)
Rnd 10: *K7, p1; rep from * to end of rnd.
Rnd 11: *M1r, k7, m1l, p1; rep from * to end of rnd. (370 (390, 410, 440, 460, 490, 540, 600, 660) sts)
Rnd 12: *K9, p1; rep from * to end of rnd.
Rnd 13: *M1r, k9, m1l, p1; rep from * to end of rnd. (444 (468, 492, 528, 588, 648, 720, 792) sts)
Rnds 14-15: *K11, p1; rep from * to end of rnd.
Rnd 16: *K3, k2tog, yo, k1, yo, ssk, k3, p1; rep from * to end of rnd.
Rnd 17: *K11, p1; rep from * to end of rnd.
Rnd 18: *K2, k2tog, yo, k3, yo, ssk, k2, p1; rep from * to end of rnd.
Rnd 19: *K11, p1; rep from * to end of rnd.
Rnd 20: *K1, k2tog, yo, k5, yo, ssk, k1, p1; rep from * to end of rnd.
Rnd 21: *K5, long loops, k5, p1; rep from * to end of rnd.
Rnd 22: *K5, k7tog, k5, p1.; rep from * to end of rnd
Rnd 23: *K11, p1; rep from * to end of rnd.
Rnd 24: Purl.
Rnd 25: Knit.
Rnd 26: Purl.
BO loosely.
Tank Section
Using the long tail method (or another cast on with good stretch) and smaller needles, CO 84 (90, 96, 102, 108, 114, 120, 138, 156) sts, pm, CO 84 (90, 96, 102, 108, 114, 120, 138, 156) sts, pm to mark beg of rnd. Join in rnd, making sure not to twist sts. (168 (180, 192, 204, 216, 228, 240, 276, 312) sts)
Ribbing Rnd: *K1, p1; rep from * to end of rnd.
Work ribbing rnd a total of 8 times.
Switch to larger needles.
Bust Increase Section
Rnds 1-3: Knit
Inc Rnd: *K2, LLI, k until 2 sts before m, RLI, k1; rep from * to end of rnd. (4 sts inc’d)
Knit 6 rnds.
Work Inc Rnd. (176 (188, 200, 212, 224, 236, 248, 284, 320) sts)
Knit 6 rnds.
Waist Decrease Section
Knit 8 rnds.
Dec Rnd: *K1, k2tog, k until 2 sts before m, ssk; rep from * to end of rnd. (4 sts dec’d)
Knit 8 rnds.
Rep last 9 rnds twice more. (164 (176, 188, 200, 212, 224, 236, 272, 308) sts)
Hips Increase Section
Inc Rnd: *K2, LLI, k until 2 sts before m, RLI, k1; rep from * to end of rnd. (4 sts inc’d)
Knit 2 rnds.
Rep last 3 rnds 12 times more. (216 (228, 240, 252, 264, 276, 288, 324, 360) sts)
Lace Edge
Work Hip Edge Chart or the written instructions below.
Rnd 1: *K3, k2tog, yo, k1, yo, ssk, k4; rep from * to end of rnd.
Rnd 2: Knit.
Rnd 3: *K2, k2tog, yo, k3, yo, ssk, k3; rep from * to end of rnd.
Rnd 4: Knit.
Rnd 5: *K1, k2tog, yo, k5, yo, ssk, k2; rep from * to end of rnd.
Rnd 6: *K5, long loops, k6; rep from * to end of rnd.
Rnd 7: *K5, k7tog, k6; rep from * to end of rnd.
Rnds 8-10: Knit.
Rnd 11: Purl.
Rnd 12: Knit.
Rnds 13-14: Rep Rnds 11-12.
BO loosely.
Straps (make 2)
With larger needles, CO 9 sts.
Knit 5 rnds.
Slip last 6 sts from needle onto safety pin or small stitch holder.
Using 3 sts that rem, work 20 (20, 21, 21, 22, 22, 23, 23, 24)” of i-cord, place sts on a safety pin.
Sl next 3 sts from garter tab onto needles, work 20 (20, 21, 21, 22, 22, 23, 23, 24)” of i-cord, place sts on a safety pin.
Sl last 3 sts from garter tab onto needles, work 20 (20, 21, 21, 22, 22, 23, 23, 24)” of i-cord, place sts on a safety pin.
Braid the three strands of i-cord, pin the end together (it will be measured to its final length to fit you during finishing).
Finishing
1) Sew ruffle to top
Step One: Mark (using safety pins), where the seams will start and end, as in diagram below (the diagram is made as if you’re looking down at the cast on edges of each piece).
Step Two: Place tank inside ruffle, both with the right side facing out. Make sure the marked spots overlap, pin together and sew (the seams are depicted by the purple line in the diagrams below).
2) Weave in ends from top and ruffle.
3) Sew garter tabs to back of top.
Step One: Mark centre back (black dot below).
Step Two: Mark locations for the garter tab edge of the straps. 2 (2, 2, 2, 2.5, 2.5, 3, 3, 3)” to either side of the centre back (shown as green dots in the diagram).
Step Three: Sew the garter tab edges to the inside of the top and weave in the ends for the straps at the back.
4)Try on top (bring a couple of safety pins with you!). Cross the straps behind you and pin them to 1.5 (1.5, 2, 2, 2, 2.5, 2.5, 2.5, 2.5)” in from where your ruffle is sewn onto your top at a length that feels comfortable to you.
5)Take off the top, unravel the extra length from the i-cords (you can cut it 4” from the pin if it’s way too long), until all 3 strands are 1/2” from where they’re pinned to the top. Slip the 9 sts onto a needle and knit three rnds, BO.
6)Sew the front tabs down.
7)Weave in remaining ends from your straps.


I was going to knit this gorgeous top but I am confused.
The pattern reads: Using the long tail method (or another cast on with good stretch) and smaller needles, THEN……………………..Switch to larger needles.
I only calls for size 10.
Thank you in advanced for you help,
Terri
Hello Terri! I’ve reached out to the designer for advice and she or I will reply as soon as possible. Thanks! – Nicola, Editor