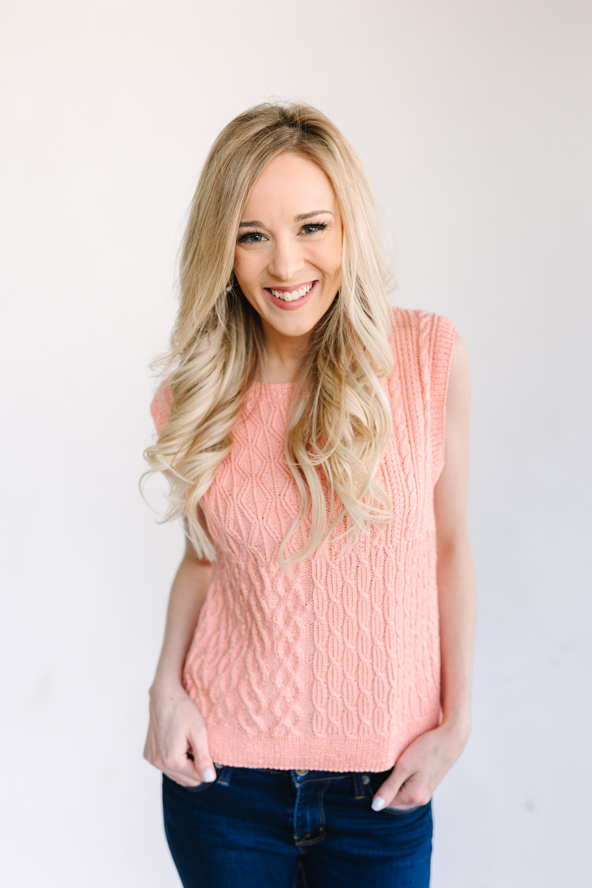
Rayanna is worked flat in pieces from the bottom up, beginning with a deep band of single ribbing, that gives way to a patchwork of four different dainty cables on the front. Highlight your cable knitting skills with this perfect-for-spring top.
Time: 48 Hours
Skill level: Intermediate
Size: Finished Bust Size 37 (41, 45, 49, 53.25)” to fit bust 32 (36, 40, 44, 48)” with 5″ ease.
Shown in size 32″
Gauge: 33 sts and 33.5 rows = 4″ [10 cm] in cable patt; 25 sts and 33.5 rows = 4″ [10 cm] in Rev St st, after wet blocking
Materials
 Yarn: Cascade Ultra Pima Fine, (100% cotton, 136 yards [125 meters]/50 grams): #3810 Peach Pearl (7 (7, 8, 9, 9) balls)
Needles: US size 2.5 (3 mm)
Notions: Tapestry needle, cable needle.
Downloads
- Rayanna Cables Top Schematic
- Rayanna Cables Top Chart A
- Rayanna Cables Top Chart B
- Rayanna Cables Top Chart C
- Rayanna Cables Top Chart D
Abbreviations
1/1 LPT: Sl next st to cn and hold to front, p1, then k1 tbl from cn.
1/1 RPT: Sl next st to cn and hold to back, k1 tbl, then p1 from cn.
1/2 LT: Sl next st to cn and hold to front, k2 tbl, then k1 tbl from cn.
2/1 LPC: Sl next 2 sts to cn and hold to front, p1, then k2 from cn.
2/1 RPC: Sl next st to cn and hold to back, k2, then p1 from cn.
1/1 LC: Sl next st to cn and hold to front, k1, then k1 from cn.
1/1 RC: Sl next st to cn and hold to back, k1, then k1 from cn.
2/2 LC: Sl next 2 sts to cn and hold to front, k2, then k2 from cn.
2/2 RC: Sl next 2 sts to cn and hold to back, k2, then k2 from cn.
Special Stitches
Edge stitch (ES)
Knit the first and last st of every row.
Cable Pattern A (12-st rep):
Work according to Chart A. Chart shows only RS rows. On WS, work sts as they present themselves.
P tbl the ktbl sts of RS.
Rep Rows 1-12 for patt.
Cable Pattern B (28-st rep):
Work according to Chart B. Chart shows only RS rows. On WS, work sts as they present themselves.
Rep Rows 1-12 for patt.
Cable Pattern C (16-st rep):
Work according to Chart C. Chart shows only RS rows. On WS, work sts as they present themselves.
P tbl the ktbl sts of RS.
Rep Rows 1-6 for patt.
Cable Pattern D (16-st rep):
Work according to Chart D. Chart shows only RS rows. On WS, work sts as they present themselves.
P tbl the ktbl sts of RS.
Rep Rows 1-16 for patt.
Pattern
Back
CO 158 (174, 194, 210, 228) sts.
Row 1 (RS): ES, * k1, p1 *, repeat from * to * to last st, ES.
Row 2 (WS): ES, * k1, yfwd and sl 1 st pwise, yarn back *, repeat from * to * to last st, ES.
These two rows establish ribbing. Work 20 more rows in ribbing as set.
Next row (RS): Work is Rev St st decreasing 38 (41, 49, 52, 57) sts evenly. (120 (133, 145, 158, 171) sts)
Cont in Rev St st until piece measures 11.50 (11, 10.75, 10.75, 10.75)”, finishing with a WS row.
Shape armhole:
BO 4 (4, 5, 5, 6) sts at the beg of next 2 rows, 3 sts at the beg of next 0 (0, 0, 2, 2) rows, 2 sts at the beg of next 2 (2, 2, 4, 4) rows, 1 st at the beg of next 16 (24, 26, 22, 24) rows. (92 (97, 105, 112, 121) sts rem)
Cont even until armhole measures 8.75 (9, 9.50, 9.75, 10.25)”, finishing with a WS row.
Shape shoulders & neck:
Note: Neck shaping beg at the same time as next shoulder shaping; read the following section all the way through before proceeding.
BO 6 (6, 7, 7, 7) sts at the beg of next 6 (6, 2, 4, 8) rows, then 5 (5, 6, 6, 0) sts at the beg of next 2 (2, 6, 4, 0) rows.
At the same time, on first row of shoulder shaping, shape neck as follows: BO center 36 (41, 41, 46, 49) sts. Working each side separately, BO at neck edge: 3 sts 0 (0, 1, 1, 2) times, 2 sts 2 (2, 2, 2, 1) times and 1 st 1 (1, 0, 0, 0) time. (0 sts rem)
When all shaping is complete, fasten off.
Front
CO 158 (174, 194, 210, 228) sts.
Row 1 (RS): ES, * k1, p1 *, repeat from * to * to last st, ES.
Row 2 (WS): ES, * k1, yfwd and sl 1 st pwise, yarn back *, repeat from * to * to last st, ES.
These two rows establish ribbing. Work 19 more rows in ribbing as set.
Next row (WS): ES, * k1, p1 *, repeat from * to * to last st, ES.
Set Patt A: Updated 10/23/2024
Next row (RS): ES, beg and ending as indicated for your size, work Chart A over the next 84 (86, 108, 108, 114) sts, Chart B over the next 72 (86, 84, 100, 112) sts, ES.
Work in patt as set for 72 rows in total, finishing with a WS row.
Set Patt B: Updated 10/23/2024
Next row (RS): ES, beg and ending as indicated for your size, work Chart C over the next 76 (92, 94, 110, 114) sts, Chart D over the next 80 (80, 98, 98, 112) sts, ES.
Cont in patt as set, until piece measures 11.50 (11, 10.75, 10.75, 10.75)”, finishing with a WS row.
Shape armhole:
BO 5 (5, 6, 7, 8) sts at the beg of next 2 rows, 3 sts at the beg of next 0 (2, 2, 4, 4) rows, 2 sts at the beg of next 2 (2, 2, 2, 2) rows, 1 st at the beg of next 22 (26, 30, 30, 34) rows. (122 (128, 142, 150, 162) sts rem)
Cont even until armhole measures 6 (6.5, 6.75, 6.75, 7.25)” from beg of armhole shaping, finishing with a WS row.
Shape neck:
Note: Shoulder shaping beg before neck shaping ends; read the following section all the way through before proceeding.
Keeping patt correct, BO center 30 (34, 38, 42, 46) sts. Working each side separately, BO at neck edge: 3 sts 1 (1, 2, 2, 2) times, 2 sts 2 (2, 2, 2, 3) times and 1 st 8 (9, 8, 9, 8) times.
Shape shoulders:
At the same time, when armhole measures 8.75 (9, 9.50, 9.75, 10.25)”, BO at armhole edge: 8 (8, 9, 9, 10) sts 3 (3, 2, 3, 2) times and 7 (7, 8, 8, 9) sts 1 (1, 2, 1, 2) times.
When all shaping is complete, fasten off.
Finishing
Block all pieces to finished measurements. With yarn threaded on a tapestry needle, sew right shoulder seam.
Neck edging:
With RS facing, pick up and knit 136 (146, 156, 176, 186) sts around neck.
Row 1 (WS): ES, * wyib sl 1 st pwise, yarn back, p1 *, repeat from * to * to last st, ES.
Row 2 (RS): ES, * k1, p1 *, repeat from * to * to last st, ES.
These two rows establish ribbing. Work 8 more rows in ribbing as set. BO all sts in patt.
Sew left shoulder and neck edging seam.
Armhole edging:
With RS facing, pick up and knit 78 (84, 88, 93, 97) sts each before and after shoulder seam along armhole. 156 (168, 176, 186, 194) sts
Row 1 (WS): ES, * wyib sl 1 st pwise, yarn back, p1 *, repeat from * to * to last st, ES.
Row 2 (RS): ES, * k1, p1 *, repeat from * to * to last st, ES.
These two rows establish ribbing. Work 8 more rows in ribbing as set. BO all sts in patt.
Rep for the other armhole.
Sew side seams with mattress stitch.
Weave in ends.


I have completed the front and back pieces through the armhole shaping. I believe the pattern directions for the front neck and shoulder shaping is correct as the numbers add up. However, on the back…in size 32, the pattern says to bind off a total of 46 stitches for the neck, which leaves 23 stitches for each shoulder… Note that the front shoulder stitches totaled 31.. that’s a problem.
From there, even though there are only 23 stitches on each side, the pattern says to bind off a total of 46 shoulder stitches for each side.. over 8 rows. Please email me with corrections Thank you
From the designer: The front and the back have different number of sts because Reverse St st has a different gauge from the cables. The sts for the Back shoulder in size 32 are 23 and for the neck 46. You should BO for each shoulder: 6 sts x 3 times and 5 sts x 1 time, as given in the instructions
I am confused. The directions say to start the front with charts C and D and then do charts A and B, but the illustration shows charts A and B at the bottom and the number of rows (72) fits the multiples of charts A and B.
From the designer: You are right, you should start with A and B for 72 rows, and then continue with charts C and D to the end.
when I go to print this out, the key for charts B and C do not print as the page is too wide.
Hi Nancy! Thank you for bringing this to our attention, we will see what we can do about adjusting the size. In the meantime, if you go to print and click on advanced settings, you should be able to “scale” the image down before printing. Let me know if that works for you! – Nicola, Editor