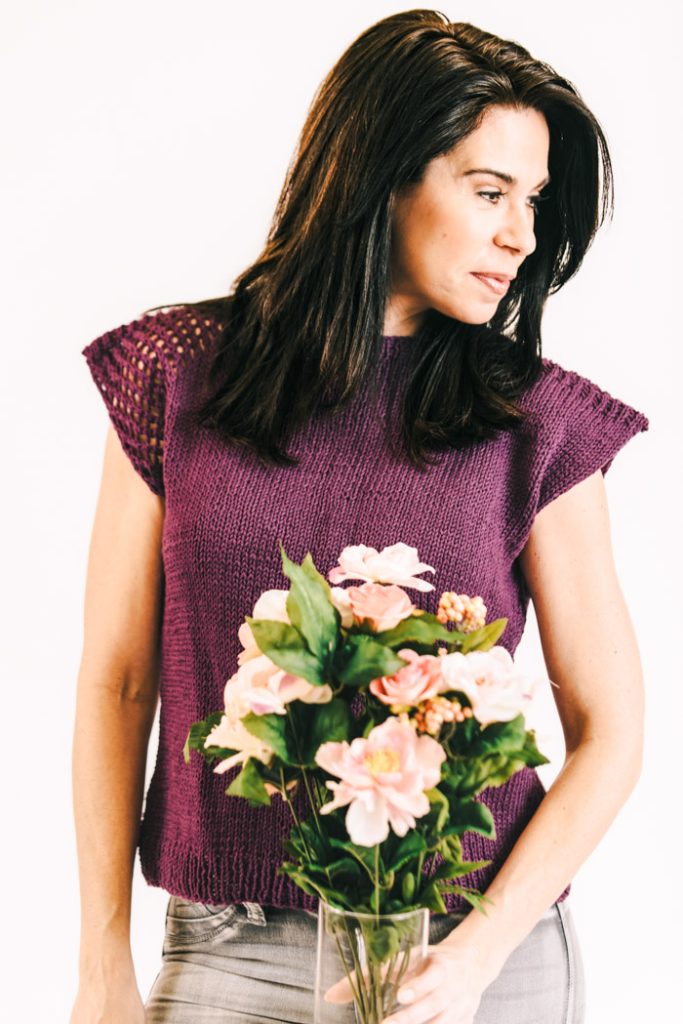
The Orchid Tee combines simple, relaxed elegance with a surprising twist. This wide-sleeved tank is a perfect project for knitters who want to dip their toes into creating a top, without the complexity. Featuring a lacy sleeve on one side, this design adds just the right amount of spice to the classic tank top silhouette, transforming an otherwise simple piece into a chic statement.
With its flattering, loose fit and breezy feel, this tee is an ideal addition to any wardrobe. The one lacy sleeve creates a unique asymmetry that adds flair, while the other side remains a clean, classic shape. Whether you’re looking to wear it as a casual summer piece or layer it for a more polished look, this tee is versatile, elegant, and fun to knit.
Perfect for those new to knitting garments, the Orchid Tee offers an easy-to-follow pattern that’s not too intimidating, yet still allows you to experience the satisfaction of creating a wearable, stylish piece. The soft, breathable yarn will keep you comfortable as you knit, and even more so when you wear your finished creation.
Skill Level: Easy
Size: 28 (32, 36, 40, 44, 48, 52, 56)”
0-2” positive ease.
Shown in 36”
Gauge: 18 sts and 24 rnds = 4” [10 cm] in St st after wet blocking.
Materials
Yarn:
![]() Knit Picks Cotlin (70% Cotton, 30% Linen; 123 yards [112 meters]/50 grams): 24836 Lilac, 4 (4, 5, 6, 7, 8, 9, 10) skeins.
Knit Picks Cotlin (70% Cotton, 30% Linen; 123 yards [112 meters]/50 grams): 24836 Lilac, 4 (4, 5, 6, 7, 8, 9, 10) skeins.
Needles: US size 7 (4.5 mm): straight or circular
Notions: Tapestry needle; stitch marker; (4) removable stitch marker
Special Stitches
1×1 Rib
Row 1: *K1, p1; rep from * to end.
Rep Row 1 for patt.
St st (worked flat)
Row 1 (RS): Knit all sts.
Row 2 (WS): Purl all sts.
Rep Rows 1-2 for patt.
Pattern Notes
This boatneck tank is worked flat in pieces from the bottom up. The front has an asymmetrical lace detail at one front shoulder. The pieces are seamed at the shoulders and sides.
Pattern
Back
CO 66 (74, 84, 92, 102, 110, 120, 128) sts.
Work in 1×1 Rib for 2”.
Work in St st until piece meas 4” from CO edge.
Waist Shaping
Dec Row (RS): K1, k2tog, k to last 3 sts, ssk, k1 – 2 sts dec’d.
Rep Dec Row every 6 rows 4 more times – 8 sts dec’d.
Work 4 (4, 4, 4, 6, 6, 6, 6) rows even in St st.
Next Row: Purl all sts.
Inc Row (RS): K1, kfb, k to last 2 sts, kfb, k1 – 2 sts inc’d.
Rep Inc Row every 6 rows 4 more times – 8 sts inc’d.
Work even in St st as necessary until piece meas 14 (14, 14½, 14½, 15, 15, 15½, 15½)” from CO edge.
Place one removable marker at each of last row worked to indicate beg of Armhole.
Cont in St st until piece meas 6 (6½, 6½, 7, 7, 7½, 8, 8½)” from Armhole marker, ending with a WS row.
Work in 1×1 Rib for ½”.
BO all sts.
Front
Work same as for Back until piece meas 14 (14, 14½, 14½, 15, 15, 15½, 15½)” from CO edge ending with a WS row.
Place one removable marker at each of last row worked to indicate beg of Armhole.
Begin Diagonal Lace Pattern at right shoulder:
Row 1 (RS): K across row to last 7 sts, (yo, k2tog) 3 times, k1.
Row 2 and all WS row: Purl all sts.
Row 3: K across row to last 8 sts, (yo, k2tog) 3 times, k2.
Row 5: K across row to last 9 sts, (yo, k2tog) 4 times, k1.
Row 7: K across row to last 10 sts, (yo, k2tog) 4 times, k2.
Row 9: K across row to last 11 sts, (yo, k2tog) 5 times, k1.
Row 11: K across row to last 12 sts, (yo, k2tog) 5 times, k2.
Row 13: K across row to last 13 sts, (yo, k2tog) 6 times, k1.
Row 15: K across row to last 14 sts, (yo, k2tog) 6 times, k2.
Row 17: K across row to last 15 sts, (yo, k2tog) 7 times, k1.
Row 19: K across row to last 16 sts, (yo, k2tog) 7 times, k2.
Row 20: Purl all sts.
Cont working Diagonal Lace Patten following this patt as est until Armhole meas 6 (6½, 6½, 7, 7, 7½, 8, 8½)” from Armhole marker, ending with a WS row.
Work in 1×1 Rib for ½”.
BO all sts.
Finishing
Block pieces.
Sew shoulder and side seams, leaving openings for the neck and armhole, use schematic as a guide. Weave in all ends. Block again as needed.


Pattern is missing Rows 16 and 18.
There are a lot of mistakes in this pattern. First, there is no schematic. Second, both sides say “Front”
Also you have “dec” where there should be “inc” in 6th line of “waist shaping”pattern.
Is there a corrected pattern with schematic???
Thank you for getting in touch. Updates have been made to the pattern. Thank you
would this be easy to make longer?
Yes. Simply decide where you’d like the additional length (at the hem or the torso) and work more rows even in pattern before beginning the armhole shaping.