

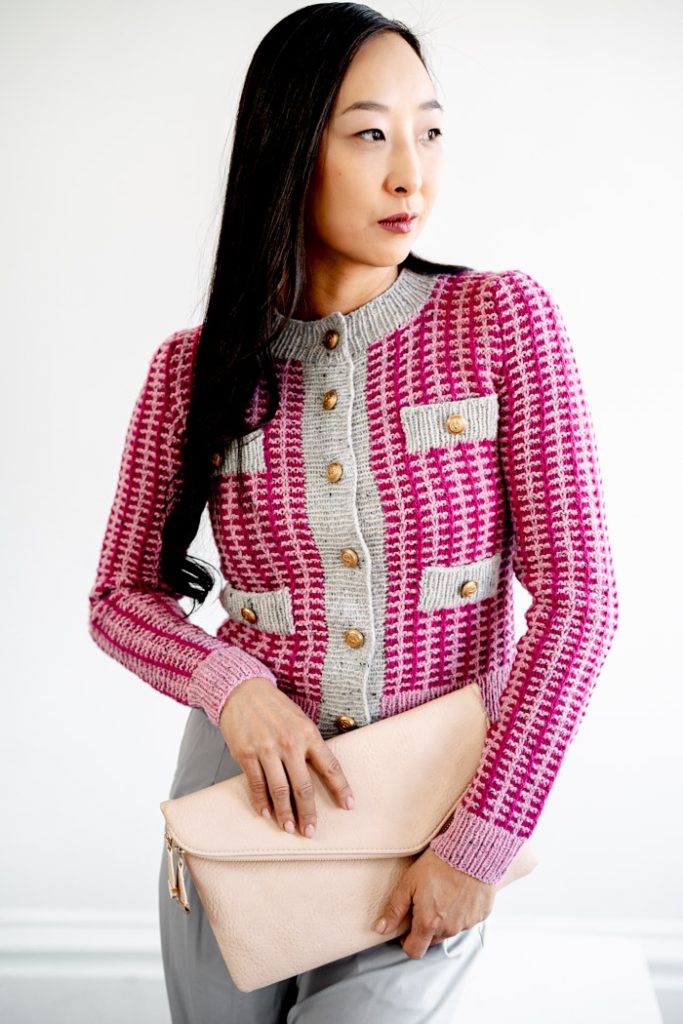
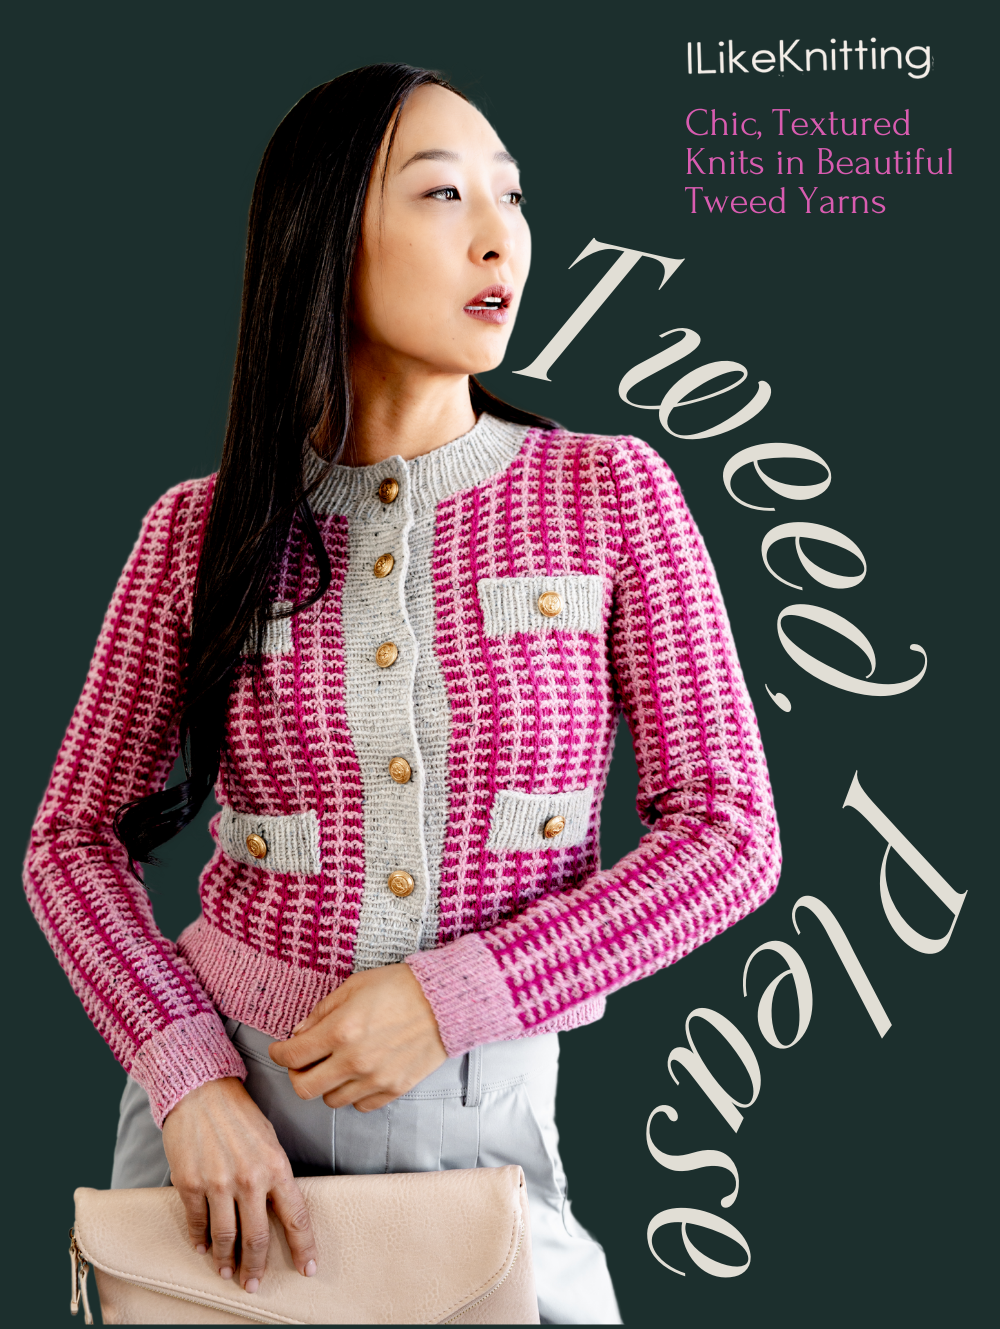
The Mademoiselle Tweed Cardigan is the perfect blend of texture and timeless elegance. Featuring a beautifully textured pattern paired with a classic, fitted silhouette, this cardigan is both polished and flattering. Subtle accent ribbing enhances the fit, while faux pockets add a touch of detail.
Whether you opt for bright, contrasting colors for a bold statement piece or choose soft, low-contrast tones for a more understated look, this cardigan is sure to become a wardrobe staple. The Mademoiselle Tweed Cardigan offers a sophisticated, modern twist on a classic design, making it a versatile and stylish addition to any ensemble.
Skill Level: Intermediate
Sizes: 32 (36, 40, 44) (48, 52, 56, 60)” final garment chest circumference, intended with 0-2” of positive ease.
Materials
 Yarn: Cascade Yarns Aegean Tweed, 100% Organic Wool, 328 yds (300 m) / 100g (3.5 oz); CC1 – Vanilla 28, 1 ball; CC2 – Primrose 31, 2 (2, 3, 3) (3, 4, 4, 4) balls; CC3 – Fuschia 12, 2 (2, 3, 3) (3, 4, 4, 4) balls.
Needles: US size 6 (4.00 mm) 21” or longer circular needle, or size to obtain gauge
Gauge: 20 st x 30 rows = 4” (blocked, in textured pattern); 24 sts x 28 rows = 4” (blocked, in 1×1 ribbing)
Notions: Tapestry needle, scissors, stitch markers, 10 buttons 3/4” diameter
Pattern Notes
The cardigan is worked bottom up, in one piece to underarm. After separating for fronts and back, each section is worked separately, shaping armholes and neck. Shoulder seams joined and Front and Neck ribbing worked first. Then sleeves knitted flat, bottom up, and sewn into the armholes. Finally, decorative 1×1 rib plackets added to the front of the cardigan.
Pattern
Bottom Hem
With CC2, CO 157 (169, 193, 211) (229, 247, 271, 289) sts.
Row 1 (RS): * k 1, p 1; Rep from * across to last st, k 1.
Row 2 (WS): * p 1, k 1; Rep from * across to last st, p 1
Rep Rows 1-2 another 8 times.
Body
Join CC3.
Work Textured Slip Stitch Pattern (referred to as Patt) as follows:
Row 1 (RS): with CC3, k1, * k2, sl1, k3; rep from * across.
Row 2 (WS): with CC3, * p3, sl1wyif, p2; rep from * across to last st, p1.
Row 3 (RS): with CC2, k1, * k5, sl1; rep from * across to last 6 sts, k6.
Row 4 (WS): with CC2, k1, * k5, sl1wyif; rep from* across to last 6 sts, k6.
Rep Rows 1-4 for Patt until body measures 12 (12.5, 13, 13.5) (14, 14.5, 15, 15)”, ending with Row 4.
Divide Fronts & Back
Next Row (RS): with CC3, work in Patt across 35 (37, 44, 48) (53, 57, 64, 68) sts, BO next 6 sts, work in Patt across 75 (83, 93, 103) (111, 121, 131, 141) sts, BO next 6 sts, work in Patt across last 35 (37, 44, 48) (53, 57, 65, 68) sts.
Left Front
Continue to work in Patt over 35 (37, 44, 48) (53, 57, 64, 68) sts of Left Front, shaping armhole as follows:
Row 1 (WS): with CC3, work in Patt to last 2 sts, p2tog. (1 st Dec’d).
Row 2 (RS): with CC2, work in Patt across.
Row 3 (WS): with CC2, work in Patt to last 2 sts, k2tog. (1 st Dec’d).
Row 4 (RS): with CC3, work in Patt across.
Rep Rows 1-4 once more. 31 (33, 40, 44) (49, 53, 60, 64) sts.
Continue to work even in Patt until the piece measures 4.5 (5, 5.5, 5.5) (6, 6.5, 6.5, 7)” from underarm, ending with RS row.
Left Front Neck Shaping
Next Row (WS): BO 11 (12, 13, 16) (17, 20, 24, 26) sts, work in Patt across. (20 (21, 27, 28) (32, 33, 36, 38) sts).
Next Row (RS): work in Patt across to last 2 sts, k2tog. (1 st Dec’d).
Next Row (WS): work in Patt.
Rep last two rows once more. (18 (19, 25, 26) (30, 31, 34, 36) Shoulder sts).
Work even until armhole measures 7 (7.5, 8, 8.5) (8.5, 9, 9.5, 10)” from underarm.
BO all sts.
Right Front
With WS facing, join CC3 after underarm sts. Begin to work in Patt over 35 (37, 44, 48) (53, 57, 64, 68) sts of Right Front, shaping armhole as follows:
Row 1 (WS): with CC3, p2tog, work in Patt across. (1 st Dec’d).
Row 2 (RS): with CC2, work in Patt across.
Row 3 (WS): with CC2, k2tog, work in Patt across. (1 st Dec’d).
Row 4 (RS): with CC3, work in Patt across.
Rep Rows 1-4 once more. (31 (33, 40, 44) (49, 53, 60, 64) sts).
Continue to work even in Patt until the piece measures 4.5 (5, 5.5, 5.5) (6, 6.5, 6.5, 7)” from underarm, ending with WS row.
Right Front Neck Shaping
Next Row (RS): BO 11 (12, 13, 16) (17, 20, 24, 26) sts, work in Patt across. (20 (21, 27, 28) (32, 33, 36, 38) sts).
Next Row (WS): work in Patt across to last 2 sts, p2tog. (1 st Dec’d).
Next Row (RS): work in Patt.
Rep last two rows once more. (18 (19, 25, 26) (30, 31, 34, 36) Shoulder sts).
Work even until armhole measures 7 (7.5, 8, 8.5) (8.5, 9, 9.5, 10)” from underarm.
BO all sts.
Back
With WS facing, join CC3 yarn after underarm sts. Begin to work in Patt over 75 (83, 93, 103) (111, 121, 131, 141) Back sts, shaping armholes as follows:
Row 1 (WS): with CC3, p2tog, work in Patt to last 2 sts, p2tog. (2 sts Dec’d).
Row 2 (RS): with CC2, work in Patt across.
Row 3 (WE): with CC2, k2tog, work in Patt to last 2 sts, k2tog. (2 sts Dec’d).
Row 4 (RS): with CC3, work in Patt across.
Rep Rows 1-4 once more. (67 (75, 85, 95) (103, 113, 123, 133) sts).
Continue to work even in Patt until piece measures 6 (6.5, 7, 7) (7.5, 8, 8.5, 9)” from underarm, ending with RS row.
Back Neck Shaping
Next Row (RS): work in Patt across first 20 (21, 27, 28) (32, 33, 36, 38) sts, BO next 27 (33, 31, 39) (39, 47, 51, 57) sts, work in Patt across last 20 (21, 27, 28) (32, 33, 36, 38) sts.
Left Back Neck Shaping
Next Row (WS): work in Patt across to last 2 sts, p2tog. (1 st Dec’d).
Next Row (RS): work in Patt.
Rep last two rows once more. (18 (19, 25, 26) (30, 31, 34, 36) Shoulder sts).
Work even until armhole measures 7 (8, 8.5, 8.5) (9, 9.5, 10, 10)” from underarm.
BO all sts.
Right Back Neck Shaping
With WS facing, join yarn at Back Neck sts.
Next Row (WS): p2tog, work in Patt across. (1 st Dec’d).
Next Row (RS): work in Patt.
Rep last two rows once more. (18 (19, 25, 26) (30, 31, 34, 36) Shoulder sts).
Work even until armhole measures 7 (8, 8.5, 8.5) (9, 9.5, 10, 10)” from underarm.
BO all sts.
Assembly
Sew shoulder seams using tapestry needle and mattress stitch.
Left Front Ribbing
With RS facing, using CC1, PU 79 (85, 89, 91) (95, 99, 103, 105) sts along Left Front.
Work in 1×1 ribbing as follows:
Row 1 (WS): *p 1, k 1; Rep from* across to last st, p 1
Row 2 (RS): *k 1, p 1; Rep from* across to last st, k 1.
Rep Rows 1-2 another 8 times.
BO all sts.
Right Front Ribbing
To determine buttonhole placement, place buttons on Left Front ribbing, evenly spaced, starting with middle of bottom hem ribbing. Keep in mind that the top button will be centered at the neck ribbing. After you have determined the button placement, mark the same spots along the Right Front edge with stitch markers.
Begin working Right Front Ribbing as for Left Front Ribbing through Row 8.
Row 9 (Buttonhole Row): * work in Patt to 1 st before m, BO 2 sts; rep from * across, work in Patt to end of row.
Row 10 (RS): * work in Patt to BO sts, Cable CO 2, sts; rep from * across, work in Patt to end of row.
Rows 11-17: work in Patt
Row 18 (RS): BO all sts in Patt. Do not break yarn.
Neck Ribbing
With RS facing, using CC1, PU 99 (107, 109, 113) (117, 121, 125, 129) sts around Neck Edge.
Work as for Left Front Ribbing Through Row 6.
Row 7 (Buttonhole Row): with CC2, [k1, p1] 3 times, BO 2 sts, work in Patt across.
Row 8 (WS): with CC2, [p 1, k 1] to BO sts, Cable CO 2 sts, [k 1, p 1] 3 times.
Rows 9-15: work in Patt
Row 16 (RS): BO all sts in Patt.
Break yarn.
Sleeves (make 2)
Cuffs
With CC2, CO 43 (49, 49, 55) (55, 55, 61, 61) sts.
Row 1 (RS): * k 1, p 1; Rep from * across to last st, k 1.
Row 2 (WS): * p 1, k 1; Rep from* across to last st, p 1
Rep Rows 1-2 another 8 times.
Join CC3.
Begin working the rest of the sleeve in Textured Slip Stitch pattern as for the Body, working increases on every 12th (12th, 10th, 10th) (8th, 6th, 6th, 6th) row as follows:
Inc Row (WS): kf&b, work in Patt to last st, kf&b. 2 sts Inc’d.
Work Inc Row a total of 9 (8, 10, 11) (14, 17, 18, 20) times. (61 (65, 69, 77) (83, 89, 97, 101) sts on the needles).
Continue to work even in Patt until the sleeve measures 17.5 (18, 18, 18.5) (18.5, 18.5, 18,5, 18.5)” from CO edge.
Sleeve Cap
BO 2 (3, 3, 4) (4, 5, 6, 6) sts at the beg on next 2 rows.
Dec Row (RS): k2tog, work in Patt to last 2 sts, ssk. (2 sts Dec’d).
Next Row (WS): work in Patt across.
Rep last 2 rows another 13 (14, 17, 17) (18, 19, 20, 20) times. 33 (35, 33, 41) (45, 49, 55, 59) sts on the needles.
Work even in Patt until sleeve cap measures 5 (5.5, 6, 6) (6.5, 7, 7.5, 8)” from BO sts.
BO 4 (4, 5, 6) (7, 8, 9, 9) sts at beg of next 4 rows. 17 (19, 13, 17) (17, 17, 19, 20) sts on the needles.
BO all sts.
Repeat for the second sleeve.
Faux Pocket Ribbing (Make 4)
Place stitch markers 21 sts apart, centered on Left and Right fronts, approximately 5” from CO edge for lower faux pockets. Place another set of markers approximately 11” from CO edge for upper faux pockets.
With RS facing, with color C, PU 21 sts along the marked row.
Begin working the Faux pocket ribbing as follows:
Row 1 (WS): * p 1, k 1; Rep from * across to last st, p 1.
Row 2 (RS): * k 1, p 1; Rep from * across to last st, k 1.
Rep Rows 1-2 another 5 times, and Row 1 once more.
BO all sts on RS, leaving a long tail for sewing up.
Fold the faux ribbing up onto the cardigan and sew in place along the two sides.
Repeat for the rest of the faux pockets.
Finishing
Sew sleeve seams together, staring at the cuff. Sew sleeves into the armholes, easing-in the sleeve edges to match the armhole edges, matching sleeve seam to the underarm sts, and the top of the sleeve cap to the shoulder seam. Weave in all ends. Steam block flat with hot iron over a wet towel. Sew buttons opposite of buttonholes, and over the front accent ribbings.
What a fantastic cardigan! This needs to be part of my work wardrobe ASAP!