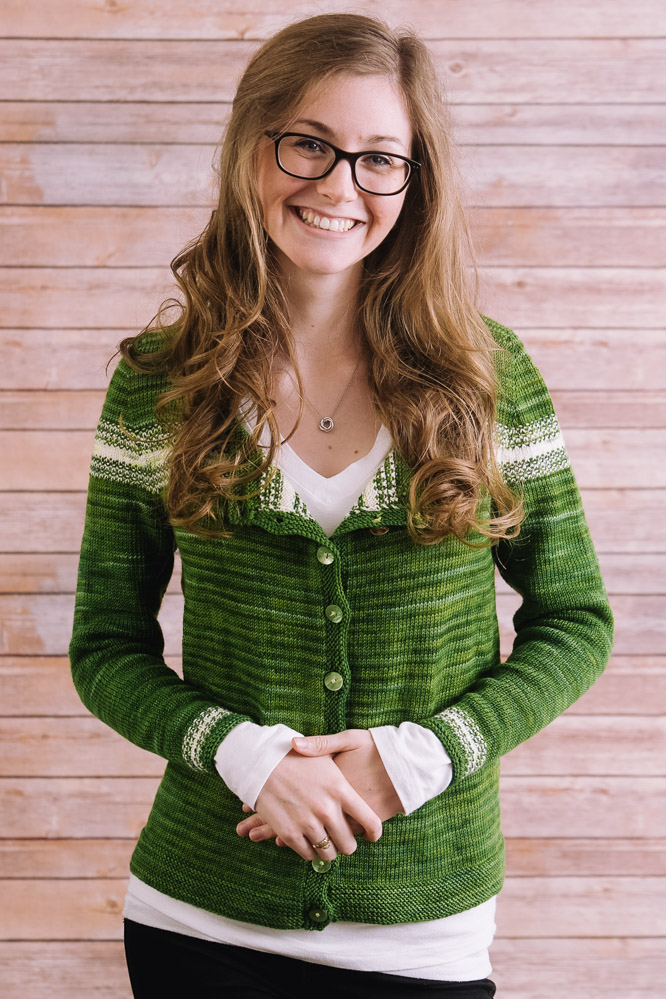
These two colors of yarn were the inspiration for this cardigan. When the designer saw them, she knew they had to be used together in a sweater. The “Faux-Isle” band on the yoke of this top-down, set-in sleeve cardigan that creates the effect of fair isle, even though you’re only ever using one color per row! This pattern is also great for using up coordinating bits of leftover yarn.
Skill Level: Intermediate
Size: 34 (36, 38, 40, 42, 44, 46, 48, 50, 52, 54)” to fit bust 32 (34, 36, 38, 40, 42, 44, 46, 48, 50, 52)”; 2″ positive ease recommended
Shown in size 34″
Gauge: 24 sts and 36 rows = 4″ [10 cm] in St st after wet blocking
Materials
 Yarn: Blue Moon Fiber Arts Socks That Rock Mediumweight (100% merino; 402 yards [368 meters]/170 grams): Mossay (MC, 3 (4, 4, 4, 4, 4, 4, 5, 5, 5, 5) skeins), Elle Rae Tipsy (CC, 1 skein)
Needles: US size 5 (3.75 mm) 24″ circular needle and double pointed needles
Notions: Waste yarn, stitch markers, tapestry needle, nine ¾” buttons
Abbreviations
m1R (make 1 right): Using left-hand needle, pick up strand between next stitch and stitch just worked from back to front, knit into front of loop
m1L (make 1 left): Using left-hand needle, pick up strand between next stitch and stitch just worked from front to back, knit into back of loop
m1Rp (make 1 right, purlwise): With left needle, lift strand between next stitch and stitch just made from front to back, purl into the back of this loop
m1Lp (make 1 left, purlwise): With left needle, lift strand between next stitch and stitch just made from back to front, purl into the front of this loop
MB (make buttonhole): Work 1-row buttonhole over 3 sts as follows: Bring yarn to front, sl1 st purlwise, bring yarn to back. (Sl1 purlwise, pass first slipped st over second) three times. Place last st back on left needle, turn work. Cable CO 4 sts, turn work. Bring yarn to back, slip first st on left needle onto right needle and pass last CO st over
Pattern Notes
This cardigan is worked completely seamlessly from the top-down with simultaneous set-in sleeves. The collar and button bands are picked up and knit at the end.
Pattern
Using MC and circular needle, CO 78 (82, 86, 88, 90, 90, 94, 96, 102, 106, 108) sts.
Beginning with a RS (knit) row, work in St st for 18 rows. Break yarn.
Set-up row (RS): With RS facing and with CO edge at top, pick up and knit last 18 (18, 18, 18, 18, 21, 21, 21, 21, 21, 21) sts along left end of CO edge, ending at the corner. Place marker. Pick up and knit 12 sts along side edge, pm, knit across all live stitches, pm, pick up and knit 12 sts along side edge, pm, pick up and knit 18 (18, 18, 18, 18, 21, 21, 21, 21, 21, 21) sts along CO edge. (138 (142, 146, 148, 150, 156, 160, 162, 168, 172, 174) sts)
Turn and purl 1 row.
Begin sleeve cap increases as follows:
Row 1 (RS): *Knit to m, slm, k1, m1L, knit to 1 st before m, m1R, k1, slm; repeat from * once; knit to end.
Row 2 (WS): Purl.
Repeat the last two rows 20 (21, 22, 22, 23, 21, 22, 22, 27, 27, 29) more times.
AT THE SAME TIME, when a total of 16 (16, 16, 16, 20, 20, 20, 20, 24, 24, 24) rows have been worked since beginning sleeve cap increases, begin working front neckline increases (and continue sleeve cap increases) as follows:
Row 1 (RS): K1, m1R, (knit to m, slm, k1, m1L, knit to 1 st before m, m1R, k1, slm) twice, knit to last st, m1L, k1.
Row 2 (WS): Purl.
Repeat the last two rows once more.
Row 3: As Row 1.
Row 4: P1, m1Rp, purl to last st, m1Lp, p1.
Repeat the last two rows three more times. (12 sts increased)
Row 5: Turn work and cable CO 27 (30, 33, 36, 39, 39, 42, 45, 48, 51, 54) sts. Knit across these sts, work as Row 1 of “Begin Sleeve Cap Increases” section.
Row 6: Turn work and cable CO 27 (30, 33, 36, 39, 39, 42, 45, 48, 51, 54) sts. Purl across these sts to end.
Continue working as set by “Begin Sleeve Cap Increases” section until all rows have been worked.
Work Faux Isle Band as follows (note: when instructed to switch colors, you do not need to break the yarn you are no longer using—you may carry them up the side of your work):
Switch to CC.
Row 1 (RS): (K1, sl1 wyif) to last 2 sts, k2.
Row 2 (and all WS rows): Purl.
Switch to MC.
Row 3: K2, (sl1 wyif, k1) to end.
Row 4: Purl.
Switch to CC.
Rows 5-6: As Rows 1-2.
Switch to MC.
Rows 7-8: As Rows 3-4.
Switch to CC.
Rows 9-10: As Rows 1-2.
Rows 11-13: Knit.
Rows 12-14: Purl.
Switch to MC.
Row 15: As Row 1.
Row 16: Purl.
Switch to CC.
Row 17-18: As Rows 3-4.
Switch to MC.
Rows 19-20: As Rows 1-2.
Switch to CC.
Rows 21-22: As Rows 3-4.
Break CC, switch to MC.
Rows 23-24: As Rows 1-2.
Begin working sleeve and body increases as follows:
Row 1 (RS): (Knit to 1 st before m, m1L, k1, slm, k1, m1R) four times, knit to end.
Row 2 (WS): Purl.
Repeat the last two rows 5 (6, 5, 7, 7, 10, 9, 11, 11, 12, 12) times more. (300 (322, 328, 352, 364, 380, 386, 410, 442, 460, 476) sts)
Divide Sleeves (RS): (Knit to m, remove m, slip 66 (70, 70, 74, 76, 78, 78, 82, 92, 94, 98) sleeve sts onto waste yarn, turn work and cable CO 6 (6, 8, 8, 10, 10, 12, 12, 12, 12, 14) sts, pm, cable CO 6 (6, 8, 8, 10, 10, 12, 12, 12, 12, 14) sts, turn work) twice, knit to end.
Beginning with a WS (purl) row, work in St st for 31 rows, then work Decrease Row as follows:
Decrease Row (RS): (Knit to 4 sts before m, ssk, k2, slm, k2, k2tog) twice, knit to end.
Work in St st for 30 more rows, then repeat Decrease Row. (184 (198, 212, 228, 244, 256, 270, 286, 296, 312, 328) sts)
Work in St st for 20 rows, then work Increase Row as follows:
Increase Row (RS): (Knit to 2 sts before m, m1R, k2, slm, k2, m1L) twice, knit to end.
Work in St st for 20 more rows, then repeat Increase Row. (192 (206, 220, 236, 252, 264, 278, 294, 306, 320, 336) sts)
Work in St st for 3 more rows, ending with a RS row.
Knit 18 rows, then BO on RS.
Sleeve (Repeat on Each Side)
Transfer 66 (70, 70, 74, 76, 78, 78, 82, 92, 94, 98) from waste yarn onto dpns (or your choice of needles for working small circumferences in the round).
Using MC and beginning in center of underarm CO, pick up and knit 6 (6, 8, 8, 10, 10, 12, 12, 12, 12, 14) sts, knit across live sts, pick up and knit 6 (6, 8, 8, 10, 10, 12, 12, 12, 12, 14) sts. Your marker should now be in the center of the undearm.
Place marker and join to work in the round.
Knit 0 (12, 18, 0, 11, 16, 6, 26, 6, 33, 21) rnds.
Next rnd (Decrease Rnd): K2, k2tog, knit to last 4 sts, ssk, k2.
Work Decrease Rnd as above on every following 7th (6th, 6th, 6th, 5th, 5th, 5th, 4th, 4th, 3rd, 3rd) rnd until you have a total of 42 (42, 48, 48, 48, 52, 52, 54, 54, 54, 54) sts remaining.
Work Faux Isle Band as follows:
Switch to CC (you do not need to break MC until otherwise instructed).
Rnd 1: (K1, sl1 wyif) to end.
Rnd 2: Knit.
Switch to MC (you do not need to break CC until otherwise instructed).
Rnd 3: (Sl1 wyif, k1) to end.
Rnd 4: Knit.
Switch to CC.
Rnds 5-6: Knit.
Switch to MC.
Rnds 7-8: As Rnds 1-2.
Switch to CC.
Rnds 9-10: As Rnds 3-4.
Break CC, switch to MC.
Knit 3 rnds.
Cuff
Rnd 1: Purl.
Rnd 2: Knit.
Repeat Rnds 1 and 2 once more.
BO all sts.
Finishing
Left Button Band
Using MC with RS facing, beginning at neck edge, pick up and knit 109 (111, 111, 115, 111, 113, 114, 121, 121, 122) sts along front edge, then 9 more sts in garter st hem. (118 (120, 120, 124, 120, 122, 122, 123, 130, 130, 131) sts)
Beginning with a WS row, knit 7 rows.
BO all sts knitwise on RS.
Right Button Band
Using MC with RS facing, beginning at bottom edge, pick up and knit 9 sts along edge of garter st hem, then 109 (111, 111, 115, 111, 113, 114, 121, 121, 122) sts along front edge. (118 (120, 120, 124, 120, 122, 122, 123, 130, 130, 131) sts)
Beginning with a WS row, knit 3 rows.
Buttonhole Row (RS): K5, [MB, k11 (11, 11, 11, 11, 11, 11, 11, 12, 12, 12)] to last 1 (3, 3, 7, 3, 5, 5, 6, 5, 5, 6) sts, knit to end.
Knit 3 more rows.
BO all sts knitwise on RS.
Neckband
Using MC with RS facing, beginning at Right Front edge, pick up and knit 170 (180, 190, 198, 212, 212, 222, 230, 248, 258, 266) sts along neck opening, ending at Left Front edge.
Knit 3 rows.
Buttonhole Row (RS): K2, MB, knit to end.
Knit 3 more rows.
BO all sts knitwise on RS.
Sew buttons to correspond to buttonholes.


Where are the pictures?
Hello! The photos are on the right hand side of the screen, or if you are on a phone they are at the bottom of the page. Hope that helps! – Nicola, Editor