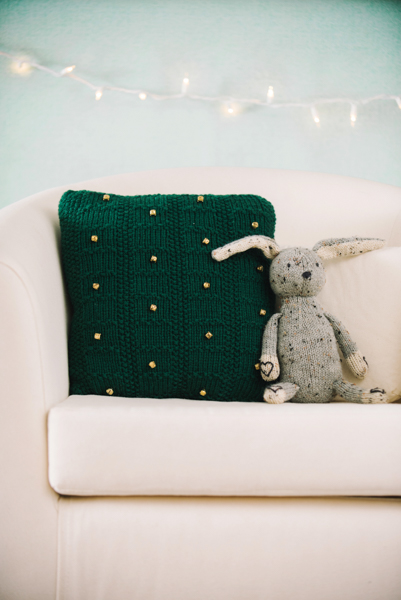
New and unique holiday décor is always welcome and Holiday Bells is a perfect addition to any home! Knit with worsted, DK or even bulky yarn, and combined with some craft store bells, this whimsical seasonal pillow will add a touch of color. Make one, or a pair, for yourself or to gift!
Skill Level: Easy
Size: 14” square to fit a 14” pillow form
Note: The fabric should be knit firmly and can be slightly smaller than the width and length of the pillow form used. It can be stretched to fit snuggly over the form.
Gauge: Approximately 7 sts = 2” in Seeded Boxes stitch
Materials:
Yarn:
![]() Laines du Pingouin France+ (50% Wool, 50% Acrylic; 126 yards [155 meters]/ 50 grams): 024 Vert, 4 balls.
Laines du Pingouin France+ (50% Wool, 50% Acrylic; 126 yards [155 meters]/ 50 grams): 024 Vert, 4 balls.
Needles: US size 9 (5.5 mm): straight or circular, or size to get gauge
Notions: Stitch markers; tapestry needle; 14” pillow form; small craft store bells; small amount of embroidery floss or heavy sewing thread in a color similar to yarn for attaching bells; crochet hook for attaching bells (in a size convenient for pulling sewing thread or floss through knit fabric to attach bells); yarn pins for holding fabric together for sewing
Special Stitches
Seed Stitch (worked over an odd number of stitches)
Row 1: *P1, k1; rep from * across row, ending with p1.
Rep Row 1 for pattern.
Seeded Boxes (multiple of 10 sts + 7, worked over 10 rows)
Row 1 (RS): (P1, k1) twice, p1, place marker (pm), *k7, p1, k1, p1; rep from * to last 12 sts, k7, pm, (p1, k1) twice, p1.
Row 2: (P1, k1) twice, p1, slip marker (sm), *p7, (p1, k1 p1); rep from * to last 12 sts, p7, sm, (p1, k1) twice, p1.
Rows 3-8: Rep Rows 1-2, 3 more times.
Rows 9-10: Work in Seed Stitch, beginning and ending each row with p1.
Rep Row 1-10 for pattern.
Note: The 5 sts at the beginning and end of each row form a border for the front and back of the pillow. To easily follow the pattern, placing stitch markers after the first 5 sts and before the last 5 sts of the Seeded Boxes pattern is recommended. (See photo in Tutorial.)
Pattern (make 2)
CO 47 sts, leaving a fairly long tail of yarn to use in sewing the pillow pieces together later.
Work in Seed Stitch for 4 rows, starting and ending each row with p1.
Next Row: Work the first 5 sts of Row 1 of the Seeded Boxes pattern, pm, continue across row in Seeded Boxes pattern to last 5 sts, pm before working the last 5 sts.
Continue in Seeded Boxes pattern, working Rows 2-10 and slipping the markers on each row.
Work Rows 1-10, 8 more times.
Work Rows 9-10 once more.
BO all sts evenly in Seed St, leaving a long tail to use in sewing the pillow pieces together.
Decide upon placement of bells and attach them to one piece (see Tutorial for instructions on attaching the bells).
Finishing
Arrange the front and back pieces next to each other with right sides up, lining up the pattern blocks. Sew one side of edges together, weaving back and forth, going through an edge stitch on each side, and maintaining a flat edge.
Note: You do not want to make a noticeable seam.
Wrap the fabric around the pillow form and continue sewing edges together, working across the top edge. Hold the other side and the bottom edges together while you are sewing, using yarn pins or clips.
Weave in any remaining yarn ends onto a tapestry needle and pull to the inside of the pillow.
Add to your holiday décor and enjoy!


Pillow was fine but would have preferred the rabbit pattern…could you possibly supply that pattern…thanks for any info…Rita