

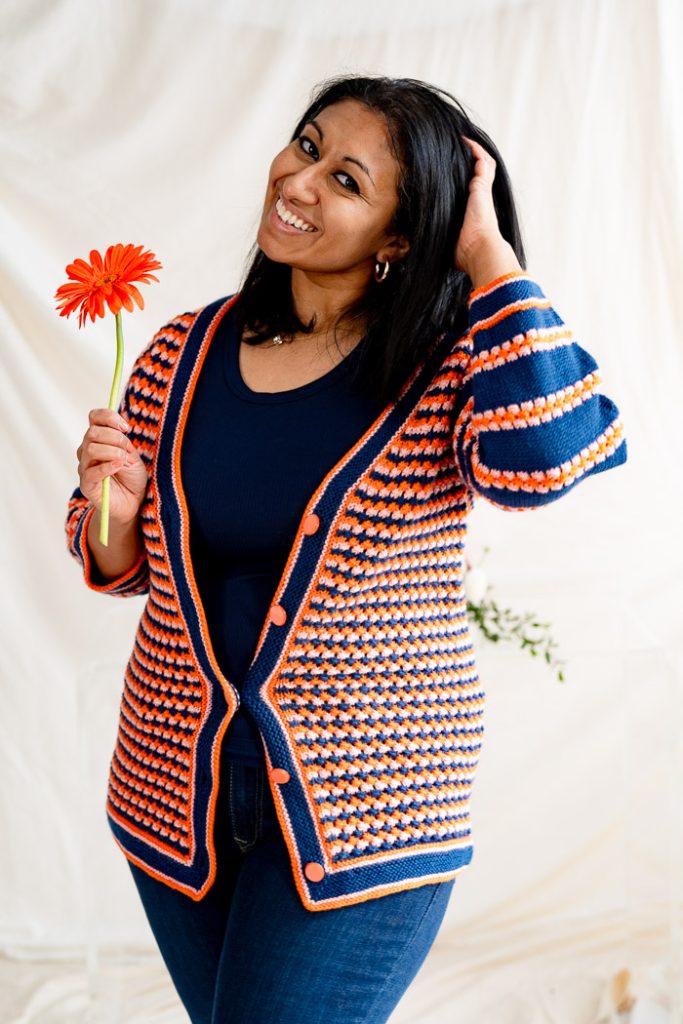
The SueAnne Star Stitch Cardigan is a vibrant and playful piece, perfect for transitioning seasons. Its body features an open star stitch pattern that provides an airy look without being lacy. The cardigan is finished with charming orange buttons, a thoughtful gift from SueAnne, who generously shared from her own collection. This cardigan blends practicality with sentimental value, making it a cherished addition to any wardrobe.
Time: 6-12 weeks.
Skill Level: Intermediate
Sizes written as XS (S, M, L, XL) (2X, 3X, 4X, 5X): Finished Bust Size 35.5 (38, 43.5, 46, 51.5) (54, 59.5, 62, 67.5)”.
6-11” of positive ease at the bust recommended.
Shown in size 38”
Gauge: 19 sts and 32 rows = 4” [10 cm] in Open 3-Color Star Stitch unblocked.
21 sts and 32 rows=4” in Star Stitch Stockinette Stripe after wet blocking.
Materials
 Yarn: Cascade Yarns 220 (100% wool; 220 yards / 100 grams): 2404 Atlantic (MC 3 (3, 3, 4, 4) (4, 4, 4, 4) hanks), 9542 Blaze (CC1 2 (2, 2, 3, 3) (3, 3, 3, 3) hanks), 1057 Peony (CC2 2 (3, 3, 3, 3) (3, 3, 3, 3) hanks)
Needles: 1 US size 4 3.5 mm, 60” circular needles. (see pattern note below)
Notions: Markers, stitch holders, waste yarn, tapestry needle, 5 ¾” buttons.
Abbreviations
MB – Make Buttonhole. See instructions under Special Stitches.
Special Stitches
Cable Cast on
- Make a slip knot and place on the left-hand needle.
- Knit into the slip knot and place the loop kwise onto the left-hand needle.
- Knit between the previous two sts, and place the loop kwise onto the left-hand needle.
- Repeat step 3 until CO is completed.
Star Stitch (multiple of 3 sts plus 2)
Row 1: (WS): With MC, P.
Row 2: (RS): With MC, K3, *yo, K3, pull first st of this group over the second two sts, rep from * to last two sts, K2.
Row 3: With CC1, P.
Row 4: With CC1, K2, *K3, pull the first st of this group over the second two stitches, yo, rep from * to last three sts, K3.
Rows 5 and 6: With CC2, repeat rows 1 and 2.
Rows 7 and 8: With MC, repeat rows 3 and 4.
Rows 9 and 10: With CC1, repeat rows 1 and 2.
Rows 11 and 12: With CC2, repeat rows 3 and 4.
Star Stitch Stockinette Stripe (multiple of 3 sts plus 2)
Rows 1 and 2: Repeat Rows 5 and 6 of Star Stitch Pattern.
Rows 3 and 4: Repeat rows 4 and 5 of Star Stitch Pattern.
Rows 5 and 6: Repeat rows 4 and 5 of Star Stitch Pattern.
Rows 7-18: Work in stockinette stitch.
One row buttonhole
- Yfwd.
- Sl1, yarn back, and leave behind work.
- *Sl1, Psso, rep from * 3 more times. Sl last st from right needle back to left needle. (4 sts removed)
- Turn work and cast on 5 sts using the cable cast on Pwise by [inserting needle from back to front behind first st on left needle, yo, draw loop through to back and place on left needle] five times.
- Turn work sl last st on right needle to left needle and K2tog with the next st on the needle.
Pattern Notes
This pattern incorporates two stitch patterns with different gauges, but different structures. The open star stitch, while not lace creates an openwork lattice that can easily be blocked into substantially different sizes. Stockinette stitch is a denser fabric and while blocking can change the shape of the piece, the percentage change is much less than the star stitch.
The star stitch bands in the sleeves submit to the stitch gauge and structure of the surrounding stockinette stitch. The body is a different matter. The garter stitch edging cannot overcome the natural gauge of the star stitch, so the cast on is made for the garter stitch gauge, and a set up row follows to reduce the stitch count.
The body is worked in one piece, to the armholes, then the fronts and backs are separated and worked separately. Then, the shoulders are seamed.
The cast on row is followed by a dec row to compensate for the gauge difference between the garter edging and the open star stitch body.
The edging is worked circularly around the entire body. Knitter will need at least 1 60” circular needle, and possibly a second to manage all the stitches. Sleeves are worked separately and sewn to the body.
Pattern
Body
Using the cable cast on and with CC1, CO 170 (210, 224, 250, 264) (290, 304, 344, 358) sts using the cable cast-on.
With MC, work a dec row as follows: K 1 (3, 1, 5, 3) (7, 5, 7, 5), [K7, K2tog] 18 (22, 24, 26, 28) (30, 32, 36, 38) times, K 7 (9, 7, 11, 9) (13, 11, 13, 11). 152 (188, 200, 224, 236) (260, 272, 308, 320) sts
WS: Begin Star Stitch with MC. Work until piece measures 15 (15, 14.75, 14.5, 14.25) (14, 13.5, 13.5, 13) inches, and end on a WS row.
Separate for Armhole
Work 32 (41, 44, 50, 53) (59, 62, 71, 74) sts, then BO 7 sts, then work 74 (92, 98, 110, 116) (128, 134, 152, 158) sts, BO 7 sts, then work 32 (41, 44, 50, 53) (59, 62, 71, 74) stitches.
After separation, sts for the back and right front may be placed on waste yarn or stitch holders.
Left Front
Continue in pattern and maintain at least two selvedge sts on the neck edge while decreasing. Dec 1 st on neck edge every other row 12 (12, 13, 12, 12) (8, 6, 6, 4) times. Dec 1 st on neck edge every 4th row 9 (10, 10, 12, 13) (17, 19, 20, 22) times. 11 (19, 21, 26, 28) (34, 37, 45, 48) sts
Work until piece measures 22 (22.5, 22.75, 23, 23.25) (23.5, 23.5, 24, 24) inches. End with a WS row.
Shape Shoulder
BO 4 (7, 7, 9, 10) (12, 13, 15, 16) sts, work to end of row, then work next row in pattern. BO 4 (6, 7, 9, 9) (11, 12, 15, 16) sts, work to end of row, then work next row in pattern. BO remaining 3 (6, 7, 8, 9) (11, 12, 15, 16) sts.
Right Front
Replace sts on needle, and work as for left front to the shoulder shaping, ending with a RS row.
BO 4 (7, 7, 9, 10) (12, 13, 15, 16) sts, work to end of row, then work next row in pattern. BO 4 (6, 7, 9, 9) (11, 12, 15, 16) Stiches, work to end of row, then work next row in pattern. BO remaining 3 (6, 7, 8, 9) (11, 12, 15, 16) sts.
Back
Replace back sts on needle and work until even with the front shoulder BO.
Shape back shoulder
At the beginning of the next two rows, BO 4 (7, 7, 9, 10) (12, 13, 15, 16), work in pattern to bor.
At the beginning of the next two rows, BO 4 (6, 7, 9, 9) (11, 12, 15, 16), work in pattern to bor.
At the beginning of the next two rows, BO 3 (6, 7, 8, 9) (11, 12, 15, 16).
BO remaining 52 (54, 56, 58, 60) (60, 60, 62, 62) sts
Sleeves (make two)
Using the cable cast on and with CC1, CO 60 (60, 60, 63, 63) (63, 66, 66, 66) sts. With CC2, K2 rows. With MC, K6 rows. With CC2, K2 rows, With CC1, K2 rows.
Work sleeve increases and pattern bands at the same time.
RS: With MC K1 row and inc 6 (6, 6, 8, 8) (8, 10, 10, 10) across the row. 66 (66, 66, 71, 71) (71, 76, 76, 76) sts.
Sleeve increases:
While working the pattern sequence, inc 1 st each side every other row 0 (0, 0, 0, 0) (5, 6, 12, 21) times. Inc 1 st each side every 4th row 0 (0, 10, 10, 22) (19, 18, 15, 8) times. Inc 1 st each side every 6th row 14 (16, 9, 9, 0) (0, 0, 0, 0) times. 94 (98, 104, 109, 115) (119, 124, 130, 134) stitches.
Pattern sequence:
Work next 6 (6, 6, 6, 12) (12, 10, 10, 6) rows. rows in stockinette. Work rows 1-18 of Star Stitch Stripe 5 (5, 5, 5, 5) (5, 5, 5, 4) times, then work pattern rows 1-6 again. Continue in stockinette stitch until sleeve measures 14.75 (15, 15, 15, 14.25) (14, 13.75, 13.5, 12.5)”. BO all sts.
Finishing
Designer Note: Block all pieces to measurement on schematic. Should the knitter want a longer/shorter/wider garment, recalculate edging and button band stitch counts.
Body edging and Button Band:
RS: With CC1, beginning at the center back of the neck, pickup 21 (22, 23, 24, 25) (25, 25, 26, 26) stitches to the shoulder seam,
pickup 48 (51, 54, 57, 59) (62, 64, 67, 69) stitches along the left V neck,
pickup 79 (79, 77, 76, 75) (74, 71, 71, 68) stitches along the front left, PM,
pickup 168 (208, 222, 248, 262) (288, 302, 342, 356) along the bottom edge AND place a marker before the last of these sts,
pickup 79 (79, 77, 76, 75) (74, 71, 71, 68) stitches along the front right,
pickup 48 (51, 54, 57, 59) (62, 64, 67, 69) stitches along the V neck,
pickup 21 (22, 23, 24, 25) (25, 25, 26, 26) sts along the back neck, pm. 464 (512, 530, 562, 580) (610, 622, 670, 682 sts.)
Rnd 1: With CC1, P to the V marker, sm, P to the corner marker, sm, K1, P to the corner marker, sm, K1, P to V marker, sm, P to end of rnd.
Rnd 2: With CC2, K to V marker, sm, K to corner marker, m1, sm, K1, m1, K to corner marker, m1, sm, K1, m1, K to V marker, sm, K to end of rnd. 4 sts increased.
Rnd 3: With CC2, repeat rnd1.
Rnd 4: With MC, K to V marker, m1, sm, K1, m1, K to corner marker, m1, sm, K1, m1, K to corner marker, m1, sm, K1, m1, K to V marker, m1, sm, K1, m1, K to end of rnd. 8 sts increased.
Rnd 5: With MC, repeat rnd 1.
Rnd 6: With MC, repeat rnd 2. 4 sts increased.
Rnd 7: With MC, rnd 1.
Rnd 8: With MC, repeat rnd 2. 4 sts increased.
Rnd 9: With MC, repeat rnd 1.
Rnd 10: With MC, K to V marker, sm, K to corner marker, m1, sm, K1, m1, K to corner marker, m1, sm, K1, m1, K 2 (2, 1, 2, 2) (2, 2, 2, 1), *MB, K14 (14, 14, 13, 13) (13, 12, 12, 12); rep from * 4 more times, K to V marker, sm, K to end of rnd. 4 sts increased.
Rnd 11: With MC, repeat rnd 1.
Rnd 12: Repeat rnd 2. 4 sts increased.
Rnd 13: With MC, repeat rnd 1.
Rnd 14: With MC, repeat rnd 4. 8 sts increased.
Rnd 15: With CC2, repeat rnd 1
Rnd 16: With CC2, repeat rnd 2. 4 sts increased.
Rnd 17: With CC1, repeat rnd 1.
Rnd 18: With CC1, repeat rnd 2. 4 sts increased.
Rnd 19: With CC1, BO Pwise.
Sew sleeves into armholes and seam sleeves. Sew buttons onto button band. Work in ends and block.