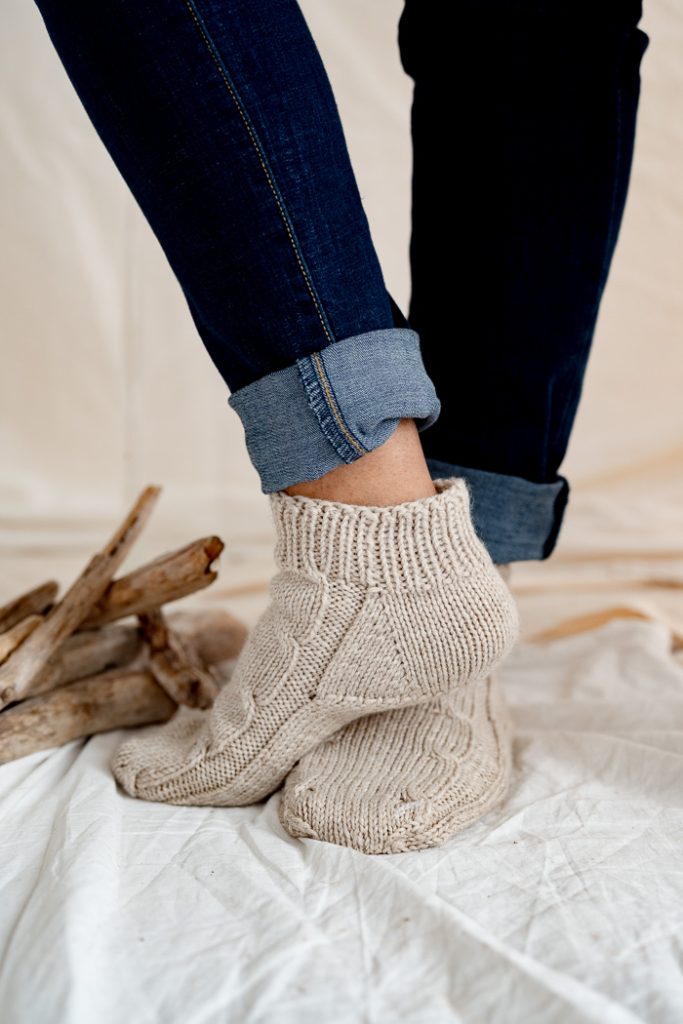
These cozy cabled house socks are a delight to knit up in worsted weight yarn, offering comfort and warmth for relaxing days spent at home. With a durable heel construction and a unisex design, these cuff-down socks are suitable for various foot sizes and make wonderful gifts.
Time: Weekend Project
Skill Level: Intermediate
XS (S, M, L) (XL, 2X, 3X)
Actual Finished Circumference: 7 (7.5, 8, 9) (10, 11, 11.5)”
To fit up to: 8.5 (9, 9.5, 10.5) (11.5, 12.5, 13)”
1-1.5” negative ease recommended.
Shown in size XL
1.5” positive ease recommended.
Shown in size 36”
Gauge: 20 sts and 32 rnds = 4” [10 cm] in St st after wet blocking
Materials
 Yarn: Cascade 220 (100%superwash wool 220 yards [200 meters] / 3.5 ounces [100 grams]): Color Number 348 1 (1, 1, 1) (1, 2, 2) balls
Needles: US size 3 3.25mm needles for preferred sock method
Notions: Markers, cable needle
Abbreviations
As est – As established.
Special Stitches
M1L – Bring the tip of your LH needle under the strand between the sts from front to back. Knit it tbl.
M1R – Bring the tip of your LH needle under the strand between the sts from back to front. Knit it.
C4B – Sl 2 sts to cn, hold to back of work, k2, k2 from cn.
C4F – Sl 2 sts to cn, hold to front of work, k2, k2 from cn.
Pattern Notes
This pattern is worked cuff down with a Strong Heel. The strong heel allows for making a gusset without having to pick up stitches. The cable rnd is worked on the first rnd of every 14 rnds. The 1st rnd of the main pattern lays out where the cables are knit.
Pattern
Cast on 34 (38, 42, 46) (50, 54, 58) using the long tail or similar stretchy cast on. Join to work in the round, placing a BOR marker as needed.
Work in K1, P1 Rib for 1.5-2”.
Main Pattern and Gusset Increases
Round 1: P2 (2, 2, 4) (4, 4, 6), C4B, k5 (7, 9, 7) (9, 11, 9), C4F, p2 (2, 2, 4) (4, 4, 6), M1R, pm, k to end of rnd, pm, M1L. (Increased st count +2)
Round 2: P2 (2, 2, 4) (4, 4, 6), k13 (15, 17, 15) (17, 19, 17) sts, p2 (2, 2, 4) (4, 4, 6).
Round 3: Work in pattern over 17 (19, 21, 23) (25, 27, 29) instep sts as est. K to marker, M1R, sm, k to marker, M1L, k to end. (Increased st count +2)
Round 4: Work in pattern over 17 (19, 21, 25) 27, 29, 31) instep sts as est. K to marker, sm, k to marker, sm, k to end.
Continue working rnds 3 and 4 until there are 31 (35, 39, 43) (47, 51, 55) heel sts and 48 (54, 60, 66) (72, 78, 84) total sts.
Heel Turn
Note: Heel is worked back and forth as rows. All slipped sts in this section are slipped with yarn to WS of work. Make note of the last rnd worked.
Row 1 (WS): P18 (20, 22, 24) (26, 28, 30), p2tog, p1, turn.
Row 2 (RS): Sl1P wyib, k6, ssk, k1, turn.
Row 3: SlP wyif, p to 1 st before gap, p2tog over gap, p1, turn.
Row 4: SlP wyib, k to 1 st before gap, ssk over gap, k1, turn.
Rep rows 3 and 4 until there are 19 (21, 23, 25) (27, 29, 31) heel sts.
Resume working in the rnd as follows: Work 17 (19, 21, 23) (25, 27, 29) instep sts as est. Ssk, knit to last 2 sts of rnd, k2tog.
Foot
Work even as est, working cables where appropriate until piece measures 0.5 (0.5, 0.5, 1) (1, 1, 1.5)” from desired length of foot.
Toe Decreases
Round 1: P2tog, work even knitting the knits and purling the purls to the last 2 instep sts, p2tog, k1, ssk, k to last 3 sts of rnd, k2tog, k1.
Round 2: Work even.
Repeat rnds 1 and 2 0 (0, 0, 1) (1, 1, 2) times.
Dec rnd: k1, ssk, k to last 3 instep sts, k2tog, k2, ssk, k to last 3 sts, k2tog, k1.
Continue to work this decrease rnd only until there are 11 (11, 11, 11) (13, 13, 13) instep and 9 (11, 11, 11) (13, 13, 13) sts on heel.
Final Decrease Round:
Sizes XS (S, M, L): k1, ssk, k2, k2tog, k1, k2tog, k2, ssk, k1, k2tog, k2, k2tog, k1.
Sizes (XL, 2X, 3X): k1, ssk, k3, k2tog, k2, k2tog, k2, ssk, k2, k2tog, k3, k2tog, k1.
Finishing
Graft toe. Weave in all ends. Gently wet block to size.


Is there a way to print this pattern? I can’t knit from online.
Hello Carol! You are welcome to save this pattern by copying and pasting into a word document or by printing the pattern via the printer icon on the left hand side of your screen. Hope this helps! – Nicola, Editor