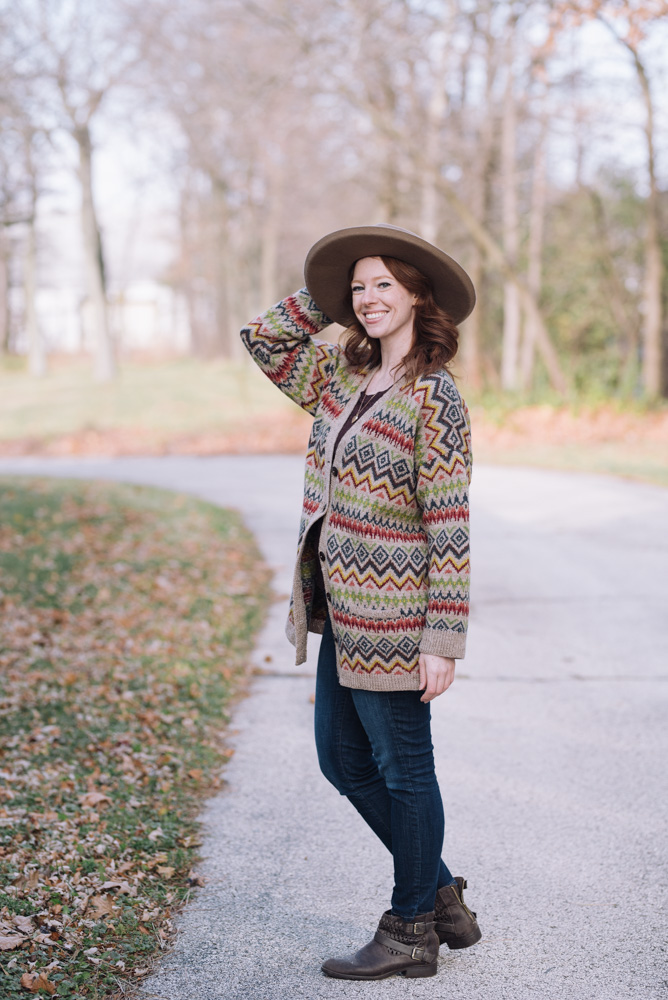
A cozy, warm western-inspired long cardigan is just what you need this winter. The silhouette is modeled with plenty of ease for a vintage-inspired, loose fit if you choose. With ribbed cuffs, lower hems and front bands, this cardigan is knit bottom-up and designed with a V-neck, full-length drop shoulder sleeves and inset pockets.
Time: 170 Hours pattern
Skill level: Intermediate
Size: 32 (36, 40, 44, 48)” to fit bust 43.25 (47.25, 51.25, 55.5, 59.5)”
11.25″ positive ease recommended.
Shown in size 36″
Gauge: 31.5 sts and 28.5 rows = 4″ [10 cm] in charted pattern, after wet blocking
Materials
 Yarn: Ancient Art Yarns Lascaux Fine 50’s (25% Manx Loaghtan Wool / 75% Punta Arenas Wool; 192 yards [175 meters]/50 grams): Irish Linen (MC, 8 (9, 9, 10, 11) skeins), Blue spruce (CC1, 2 (2, 3, 3, 3) skeins), Milk chocolate (CC2, 1 (1, 1, 1, 1) skein), Coral (CC3, 1 (1, 1, 1, 2) skeins), Syrah (CC4, 2 (2, 2, 2, 2) skeins), Outrageous (CC5, 1 (1, 1, 2, 2) skeins), Summer’s end (CC6, 2 (2, 2, 2, 2) skeins).
Needles: US size 2.5 (3mm) straight or circular
Notions: Tapestry needle, stitch holder, six 0.75″ buttons
Special Stitches
Semi-tubular 1×1 Ribbing
Row 1 (RS): *K1, p1; rep from *.
Row 2 (WS): *Yfwd, sl 1 pwise, yarn back, k1; rep from *.
Rep these 2 rows.
Double Selvage stitch (DS)
Row 1 (RS): Sl 1 wyib, k1, work in given stitch pattern to last 2 sts, sl 1 wyib, p1.
Row 2 (WS): Sl 1 wyib, p1, work in given stitch pattern to last 2 sts, sl 1 wyif, p1.
Rep these 2 rows.
Horizontal one-row buttonhole
With RS facing, work in rib pattern, ending with a purl st (yarn is in front). Sl the next st, bring yarn back and BO the sl st by lifting it up and over the 2nd st and off the needle. BO 4 more sts the same way ( 5 sts bound off). Sl the 1st st on RH needle back to LH needle. Turn the work so that the WS is facing, pick up the yarn and pull on it to prevent a gap from forming at the beg edge of the button hole, insert the RH needle bet the first 2 sts on the LH needle, then use the cable method to CO 6 sts, bringing the yarn to the front bet the needles before placing the 6th st on the LH needle. Turn the work so the RS is facing and sl 1st st on the LH needle Kwise onto the RH needle, then lift the last CO st over the sl st and off the needle. Return the last (sl) st back onto the LH needle (1 buttonhole completed) and work in rib with the rem sts.
Sloped BO
To prevent “stair steps” from forming between subsequent BO rows, use the sloped BO method as following: On the first BO row, bind off as usual to define the initial part of the slope. Work the next row to the last st, but do not work the last st. Turn work so that the unworked st becomes the first st on the RH needle. Sl the first st on the LH needle Pwise, then BO the unworked st by lifting it over the sl st and off the needle.
Pattern Notes
Fair Isle pattern
Work according to chart. Start and finish as indicated on chart, and repeat in width every motif respectively. In height always repeat Rows 1-60.
In order for the pattern stitch to flow continuously around the body without interruption by side seams, the right front, back and left front are worked in a single piece to the armholes. Then the fronts and back are worked separately to the shoulders to create the armhole openings.
Pattern
Pocket linings (Make 2)
With MC, CO 35 (35, 37, 37, 37) sts.
Work in St st until pocket measures 4.75″.
Break yarn and leave sts on a holder.
Body
With MC, CO 325 (353, 388, 421, 449) sts.
Work in 1×1 ribbing until piece measures 1.5″.
Continue in fair-Isle pattern following chart for 43 (43, 43, 43, 43) rows and with RS facing for next row.
Place pocket
Next Row (RS): Work in pattern 22 (26, 29, 33, 37) sts, sl next 35 (35, 37, 37, 37) sts onto a holder and, in their place, work in pattern across 35 (35, 37, 37, 37) sts of first pocket lining, continue in pattern with next 211 ( 231, 256, 281, 301) sts, sl next 35 (35, 37, 37, 37) sts onto a holder and, in their place, work in pattern across 35 (35, 37, 37, 37) sts of second pocket lining, continue in pattern with the rem 22 (26, 29, 33, 37) sts.
Continue in pattern until piece measures 19.5 (19.5, 19.5, 19.5)” and 128 (128, 128, 128, 128) rows of fair-Isle pattern have been completed and with RS facing for next row.
Shape V-Neck
Dec 1 st 12 (13, 14, 15, 15) times at each end of every 2nd row and 13 (13, 13, 14, 15) times at each end of every 4th row.
Right front
At the same time, when piece measures 20.25 (20.25, 20.25, 20.25)” and 134 (134, 134, 134, 134) rows of fair-Isle pattern have been completed and with RS facing, separate work to shape armholes, as following:
Next Row (RS): Work in pattern 78 (85, 94, 102, 109) sts, inc 1 st at the end (for the armhole seam) and sl next 247 (268, 294, 319, 340) sts onto a holder. 79 (86, 95, 103, 110) sts
Continue in pattern until piece measures 8.25 (9, 9.25, 9.75, 10)” from begin of armhole shaping and with WS facing for next row.
Shoulder shaping
Keeping pattern correct, CO at the beginning of next and every WS row, as following: 9 (10, 11, 12, 13) sts 6 (6, 4, 4, 4) times and 0 (0, 12, 13, 14) sts 0 ( 0, 2, 2, 2) times.
Back
Bring back on needle the next 169 (183, 200, 217, 231) sts from holder and keeping pattern correct, continue working the back, inc on the first row 1 st at each end (for the armhole seam) and leaving the rem sts on hold. 171 (185, 202, 219, 233) sts
Continue in pattern until back measures 8.5 (9, 9.25, 9.75, 10)” from begin of armhole shaping and with RS facing for next row.
Shoulder shaping
BO 9 (10, 11, 12, 13) sts at the beginning of next two rows, then BO at the beginning of every following row: 9 (10, 11, 12, 13) sts 5 (5, 3, 3, 3) times and 0 ( 0, 12, 13, 14) sts 0 ( 0, 2, 2, 2) times.
BO the rem 63 (66, 66, 71, 73) sts for neckline.
Left front
Bring back on needle the rem sts from holder and keeping pattern correct, continue working the left front, inc on the first row 1 st at right edge (for the armhole seam).
Work as for right front, reversing shaping.
Sleeves (make 2)
With MC, CO 78 (84, 90, 102) sts.
Work in 1×1 ribbing until piece measures 2.5″.
Continue in fair-Isle pattern, starting from Row 21 of chart and inc 1 st at each end as following:
On every following 4th row 23 times, then at each end of every following 6th row 3 times.
134 (140, 146, 152, 158) sts
Work even for 4 rows until piece measures 18″, 114 total rows of pattern worked.
BO all sts.
Note: The last row of sleeve should match with the last row of body before the beginning of armhole shaping.
Finishing
Right Front & neck band
With MC, CO 15 sts and work as following: DS, 13 sts in semi-tubular 1x1rib, starting with p1. When band measures 0.75″, make one buttonhole 5 sts from edge, then work 5 more buttonholes with a distance of 3.75″ between them. When band measures 34.75 (35.5, 35.75, 36.5, 37)”, leave sts on hold.
Left Front & neck band
With MC, CO 15 sts and work as following: 13 sts in semi-tubular 1×1 rib, starting with p1, DS. When band measures 34.75 (35.5, 35.75, 36.5, 37)”, leave sts on hold.
Join the 2 bands together along the stitches left on hold and sew using grafting.
Matching band-seam with center of back neckline, sew inner edge of front-neck band around front edges and back neckline.
Sew the buttons on the left band, opposite to the buttonholes.
Block all pieces to finished measurements.
Whipstitch pocket linings to WS of fronts. With yarn threaded on a tapestry needle, sew shoulder and underarm seams. Sew sleeves into armholes.
Pocket Tops (Make 2)
Sl 35 (35, 37, 37, 37) sts from pocket holder onto needles and rejoin MC with RS facing.
Knit 1 row, inc 1 st at each end of row. 37 (37, 39, 39, 39) sts
Work 6 rows in 1×1 rib and CO in rib.
Sew sides of pocket tops to RS of fronts.
Weave in ends. Block again, if desired.


Like others I’m looking for the charts and I don’t see them on the right side under the photos. I even tried to print off the pattern but the charts aren’t printed either. Please Help!!!
Hello Carol! Charts are available for logged-in Gold Members at the bottom of the pattern and appear as a blue button to click and download. – Nicola, Editor
Is there anyway to purchase this pattern without being a member?
Hello Patt, we do not offer individual pattern sales at this time. The designer of this pattern may or may not put this pattern up for individual sale on her own platforms. – Nicola, Editor
Hello
I’m looking at this pattern on your website but an unable to find the charts. Can you please give me instructions on where they are as I think I’m missing something. Thanks.
Hi Polly! The charts are on the right hand side of the page underneath the photos. Happy knitting! – Nicola, Editor
I hope you can help me print patterns I’m working on by printing them very soon. Thank you
Hello! You are welcome to save this pattern by copying and pasting into a word document or by printing the pattern via the printer icon on the left hand side of your screen. Hope this helps! – Nicola, Editor
Can I print off copy of pattern I’m working on
Hello! You are welcome to save this pattern by copying and pasting into a word document or by printing the pattern via the printer icon on the left hand side of your screen. Hope this helps! – Nicola, Editor
Where is the chart for WesternWinter Fairisle Cardigan
Hello! The charts can be found on the right hand side of the page under the photos. Happy knitting! – Nicola, Editor